Showing posts with label dessert. Show all posts

Tuesday, October 4, 2011

Rustic Apple Tart


I was hoping to chronicle all my treasures from my once a month cooking (OAMC) experiment for weeks to come but all I have managed to try is my meatloaf muffins based on the recipe I previously posted and the link from last week.  The cilantro chicken, also posted last week (which was fantastic as I mentioned and I am making that again tonight) and a Beef-Ginger Stir-Fry that left me wondering if my love affair with the once a month cooking wasn't unlike my love of bad boys in my early 20s.  While it may have seemed like a good idea at the time it ended up leaving me feeling like maybe I could have done better, not to mention the bad taste left in my mouth. 

Like the bad boys, the Beef-Ginger Stir-Fry did NOT make the cut for things to try again.  In fact I have a second batch all frozen are ready to go if someone would like a dry, sub-par version of NY strip steaks.  What a waste (hangs head in shame).  I will let you know how we continue to do and maybe I will just have to start making a pre-cooked menu of my own for tried and true recipes.  You know I am picky about the way food should look and taste... I would not steer you wrong.  Observe something that did make the cut.


Anyway, to uplift my poor broken food spirits, I dug deep into my bag of tricks and by this I mean my iphone and realized I never told you about the tart.  Ahhhh the tart.  Bright and fruity and buttery, and seasonal and a good way to help use up those 50 pounds of apples you picked because your 3 year old just had so much fun picking them with his parents and visiting Uncles.


What to do with so many?  I was told they would keep forever, and so after taking them home and washing them and tossing the bags we brought them home in I looked up their website on how to best care for our lovely little treats.  The website said and I paraphrase a quote "do not pre-wash your apples.  Leave them in the bags we have provided with a damp paper towel in the crisper of your refrigerator."  Oops.  Oh well maybe I could make individual versions of the tart for my own freezable meal.  I could handle eating apple tarts for breakfast with coffee.  In fact this recipe is light and despite the sugar does not feel overly dessert-like because it doesn't have a hint of cinnamon.  Not a trace of nutmeg or any other traditional spices that scream apple dessert to me.  Such a nice change of pace although I had to really work on restraining myself.  My hand was just dying to sprinkle some cinnamon somewhere!  And should we run out of apple since I did not store them properly, we can always go back.  It was fun after all.

and delicious... don't forget the delicious part.

Free-Form Apple Tart
Food and Wine
Ingredients
2 1/2 cups all-purpose flour
1/2 cup plus 1 teaspoon sugar
Kosher salt
1 1/2 sticks unsalted butter, cut into 1/2-inch cubes and chilled
About 1/2 cup ice water
1 teaspoon finely grated lemon zest plus 1 teaspoon juice
4 Arkansas Black or Granny Smith apples—peeled, cored and thinly sliced
1 large egg white, beaten
2 tablespoons turbinado sugar
Methods
In the bowl of a standing mixer fitted with the paddle, combine the flour with 1 teaspoon of the sugar and 1/2 teaspoon of salt. Add the butter and mix at low speed until it is the size of small peas, 30 seconds. With the machine on, gradually add 1/4 cup of the ice water. Add as much of the remaining ice water as needed, 1 tablespoon at a time, until the dough is just evenly moistened (it shouldn't mass on the paddle). Turn the dough out onto a work surface and knead 2 or 3 times, just until it comes together. Pat the dough into a disk, wrap in plastic and chill for 1 hour or overnight.
Preheat the oven to 400° and line a large cookie sheet with parchment paper. On a lightly floured work surface, roll out the dough to a 17-inch round, then trim it to a neat 16-inch round. Transfer the dough to the cookie sheet.
In a medium bowl, combine the remaining 1/2 cup of sugar with the lemon zest and a pinch of salt. Add the apples and lemon juice and toss well. Arrange the apples on the dough in 2 concentric circles, leaving a 3-inch border all around. Fold the edge of the dough up and over the apples, overlapping the dough on itself as needed. Brush the rim with the egg white and sprinkle with the turbinado sugar.
Bake the pie in the center of the oven until the crust is golden and firm and the apples are tender, about 55 minutes. Transfer the cookie sheet to a rack to cool. Slide the pie onto a plate, cut into wedges and serve.

**Make Ahead
The dough can be frozen for up to 1 month. The tart can be baked earlier in the day and rewarmed before serving.

Saturday, September 17, 2011

Raspberry Flaugnarde (gesundheit)

 
Photo by Tina Rupp

We went raspberry picking last weekend with visiting family and as we walked the rows of berries I said we need enough berries to make... ahhh... Cl... ummm.... Coul-fatie?  Followed by the disclaimer that I had no idea how you pronounce it because I've only seen it in Food and Wine but it looked fabulous and I've wanted to make it ever since.  I couldn't explain if it was a custard or a cake, and now that I've actually had it it's really neither.  And it's not even a clafoutis it's a flaugnarde.

According to my sources (i.e. Wiki) the clafoutis is a baked classic French dessert of black cherries (containing pits) covered in a thick flan-like batter (I disagree with this description, not being a big fan of flan, which my Aunt describes as custard that couldn't get a hard on... lovely... moving on).  It is dusted with sugar and served lukewarm.  The dessert originates from the Limousin region and when baked with any other fruit it is actually a flaugnarde.  And apparently the word is "bastardized" as Clafouti... good gracious no... a missing s... whatever shall we do?

Clafoutis/Clafouti/flaugnarde... I don't care how you spell it it is G O O D!  I stole the photo from above because I didn't want to scare you with my photo.


I would like to blame my photo skills but honestly it was an ugly duckling of a dessert. 


Any better?  No you're right.

Some recipes call for it to be completely golden brown on top like ours but all the good photos look like the one above all creamy and white.  I suspect this has something to do with food styling and using painted food when things do not appear the way we want them to.  I like to think of it as proof that even gorgeous food like gorgeous people are retouched!  It was getting a bit late by the time it came out of the oven so I tried to take it outdoors, then decided I would take a photo the next day in natural light.  After all there were 4 1/2 of us and 8 pieces of dessert surely there would be a slice a smidge something leftover to take a photo of.... and there was... did I show you the left over berries?


I am sure it has something to do with the fresh berries that were like little pillow of fruity velvet on the tongue.  Something so rich, so delicious, so fantastic that what you see above is probably all that survived the onslaught of people eating the berries with cream and just straight from the refrigerator.  I have been counting the days all week until this weekend when we could go again and pick two to three times as many so that there could be many a flaugnarde in our futures but the weather did not cooperate.  Maybe tomorrow... hope hope.  Either way it is raspberry season get thee to a raspberry picking place and make this today.  Your stomach will thank you.  Oh and did I mention that it takes about 5 minutes to throw together... can't beat that with a stick could you?

Raspberry Clafoutis
Food and Wine
Ingredients
1/2 cup all-purpose flour
1/4 cup plus 2 tablespoons sugar
Salt
3 large eggs
3 tablespoons unsalted butter, melted
Finely grated zest of 1 lemon
1/4 cup plus 2 tablespoons milk
1 1/2 pints raspberries (3 cups) (there is NOOOO way 3 cups would have fit.  I used 1 1/2 tops I would say just have a lot and add them until full)
Confectioners' sugar, for dusting
Method
Preheat the oven to 350°. Butter a 9-inch gratin dish. In a bowl, whisk the flour, sugar and a pinch of salt. Whisk in the eggs, butter and lemon zest until smooth. Add the milk and whisk until light and very smooth, about 3 minutes. Pour the batter into the gratin dish and top with the raspberries.
Bake for about 30 minutes, until the clafoutis is set and golden. Let cool slightly. Dust with confectioners' sugar, cut into wedges and serve.

Monday, August 22, 2011

Strawberry Rhubarb Crumble with Irish Whiskey Butter


I would love to say that I am not one to wish away a season but the truth is... I am.  I totally am.  I cannot wait for Summer to get here and then towards the end after a month of sticky 100+ degree days and three showers a daw and sweaty cranky children, and being held hostage in your house because you could get heat stroke if you go out into the world I am ready for Fall.  Being from Vermont Fall has always been my favorite season anyway.  The leaves in the mountains during foliage season are just breath taking. Go ahead and google it if you've never been.  You will be amazed, you will be jealous, you will think... no way does the whole state look like that... but it pretty much does.  I have so many great memories of Vermont that I often get homesick just thinking about it.  I am crossing my fingers that we will get to go home during foliage for the first time since we moved out to Cornfield-Central.

I mean who wouldn't want to be around this?


Photo via Google images

or this?

Darn it, now I want to go fishing too!

One of my Summer to Fall memories as a child was eating rhubarb at my Grandmother's house.  My cousins and I would go out to the side of the yard and choose our giant stalks of rhubarb, go into the house and peel them and pour out little dishes of sugar and salt to dip them in.  I tried to plant some rhubarb this year so I could continue the tradition with my own children.  However I was more inspired by nostalgia to plant it in the same area of the yard than by reason and the weeds in the back of the lot drowned the poor buggers in shade and I was greeted not by the blushing stalks but by whithered sad little brown strings.  I am hoping some of them make it back next year but it is a small hope.  Luckily you can buy rhubarb in any store or farmer's market right now and make this dish.  On a positive note I saw about 4 teeny tiny strawberries on the plants we planted on the side of the house so my son is very excited about that.  I don't think we will get enough to make jam as the goal is eventually but even if one survives long enough to be picked and eaten by the Monkey he will be thrilled.

these were frozen and made them a bit more sour than I expected


Strawberry-Rhubarb Irish Crumble with Irish Whiskey Butter
Ingredients
Irish Whiskey Butter:
1/2 cup (1 stick) unsalted butter, at room temperature
3/4 cup confectioners' sugar
1/4 cup Irish whiskey
Crumble:
5 cups quartered strawberries
3 cups sliced rhubarb, about 1/3-inch thick (fresh or frozen and thawed)
1/2 cup sugar
1/4 cup cornstarch
1 teaspoon fresh lemon juice
3/4 cup flour
3/4 cup old-fashioned oats
2/3 cup packed light brown sugar
Pinch salt
6 tablespoons cold unsalted butter, diced
Method
To make the Irish whiskey butter, place the butter in a mixing bowl and whip until fluffy. With the mixer running, gradually add the confectioners' sugar. Slowly add the Irish whiskey until combined. The mixture may look separated and curdled at first but if you continue whipping, it will come together. Topping may be used at room temperature or chilled.
Preheat oven to 375o F. Lightly grease a 7-by-11-inch baking dish and set aside.
In a medium bowl, combine the strawberries, rhubarb, sugar, cornstarch, and lemon juice. Toss to coat. Pour the strawberry mixture into the prepared baking dish.
In a medium, mixing bowl, add the flour, oats, light brown sugar, and salt, stirring to combine. Add the diced butter to the flour mixture, and using your fingers, work the mixture until it resembles coarse crumbs. Pour the crumb mixture evenly on top of the strawberry mixture.
Place the baking dish in the oven and bake for 40 minutes, or until the filling is bubbly and the topping is golden brown.
Serve warm with a spoonful of the Irish Whiskey Butter.


Tuesday, July 5, 2011

Stuffed Strawberries


We cancelled our travel plan for the weekend due to being overwhelmed by life and family illness, and instead spent a relaxing weekend visiting friends, and eating a lot of good food.  I mean a lot!  I spent a lot of time in the kitchen but stuck with relatively simple dishes.  Like this quick and festive dessert that was easy and will certainly be brought to many BBQs this year.  Once the cover came off these guys they did not last very long and the Monkey ate as many as his pudgy little hands could steal before the adults got to them.  I used almond extract for this batch but I think I will use vanilla next time.  I also toasted the pecans and did half topped with the chopped toasted pecans and half topped with mini chocolate chips.  Once in the tray they were so cute all red and white I decided to fill in the remaining area with blueberries and blackberries to make it 4th friendly.... also a hit, and a keeper of an idea.  Couldn't be simplier and a huge hit... what more can you ask for?  What's that you say?  To be able to eat dairy so you can enjoy your own dessert... why yes that would have been nice too. :)


Stuffed Strawberries
adapted from Food Network

Ingredients


20 whole large strawberries, hulled
8 ounces cream cheese, softened (next time I will use marscapone, they were out of the good cream cheese and I think the store brand was a little too cheesy)
1/4 cup confectioners' powdered sugar
1/4 teaspoon vanilla or almond extract
2/3 cup chopped pecans

Method

Cut a thin slice from the bottom of each strawberry so the berries stand upright. Place berries, cut side down, on a serving platter. Carefully cut the berries into 4 wedges, cutting almost to, but not through, the bottoms with a criss-cross cut. Fan wedges just slightly, taking care not to break them (this fanning did not occur easily for my set... see detail about investing in bakers bag for next time). Set aside.

In a mixing bowl, beat together the cream cheese, sugar, and vanilla until combined but still stiff. Using a teaspoon or pastry bag with decorative tip (I used a ziplock sandwich bag with the corner cut off but will definitely spend the extra $2 for a bakers bag for next time), fill the strawberries with the cream cheese mixture. Sprinkle chopped pecans on top of the stuffed strawberries. Cover and refrigerate until ready to serve.

Monday, December 20, 2010

Five Days and Counting... Buttered Toffee


I don't know how to tell you this but SOMEONE has been  holding out on us!  Well maybe not you but they definitely have been holding out on me!  I was always under the impression that making toffee was difficult and involved and expensive, and many other factors were involved that kept me from ever trying to make it.  My little experiment with Salted Caramel Squares did nothing to ease these fears.

However, I was looking over The Pioneer Woman's blog the other week and there was this gorgeous toffee (not well represented by my sad little picture taken at 11pm when I was completely exhausted and was just happy to be on my way to bed).  I decided I would have to make the toffee, it was lovely, it was calling to me.  I printed the recipe and the only thing I really did was scan the list to see if I had everything I needed...  yuppers... we're good.  Then after I finished my final on Saturday I pulled the recipe out and noticed.... WAIT A MINUTE.... this is simple. 

However the fear from the Salted Caramel Square masacre of 2010 still haunts me a little so I eyed my candy thermometer and quietly and calmly threatened it's aluminum life should it let me down again.  Turns out you can threaten inanimate objects into doing your bidding.  It must have been the fault of the demon oven of days past.... not to be confused with the current demon oven, maybe that should be a lesson to the new demon oven... look what happens when you don't get in line... you are secretly removed from the kitchen in the middle of the night, never to be heard from again.

Here are the basic steps.... add ingredients.  Boil ingredients (I have no picture here because I was afraid to leave the pot less we repeat the nightmare that shall not be named further) until they hit 298 on the candy thermometer.  Spread resulting toffee thinly (however I had one thin batch and one thick batch because it makes quite a lot in my opinion and I prefer the thicker batch.


Let those little babies cool.

Prepare your toppings.  I used sprinkle ball thingies for a little flash of color and toasted pecans on the other batch.  I don't like to make only one batch of things that contain nuts in case someone can't eat them.

Melt your chocolate.  Let cool briefly so as to not crack the toffee.  Pour half over each batch of toffee.  Using a flexi-spatula thing spread chocolate over the toffee and add toppings as thick or thin as you would like.


Let cool... this part took awhile.  Probably not a problem if you're making them during the day but I made them late and was hoping to have them wrapped as part of a Christmas gift for Monkey's teachers.  I ended up sticking them in the fridge.


Let cool completely.  Carefully flip and repeat with second half of chocolate and toppings.  Break into pieces.  I attempted to break them into standardized pieces so I could make a nice little presenation for the teachers but the pieces that are left for us are a mess.... who cares really?  You know other than me and my OCD?

For the recipe, details, and better photos check out Pioneer woman's site here.

Monday, April 19, 2010

Coconut-Chocolate Creme Brulee


After all of the recipe stealing I do around here I am happy to post one of my own recipes.  This dessert was inspired by Smokejacks on Church Street in Burlington, Vermont.  A restuarant I am sorry to say no longer existed the last time I visited. 

We served this at the end of a wine tasting this weekend and it won over even those that aren't big fans of coconut and probably ate the dessert just to be polite.  The chocolate was the main flavor with a mild coconut finish.  If only all the dirty stemware had dissappeared as fast as the dessert my Sunday probably would have been more enjoyable.


Coconut-Chocolate Crème Brulee


Ingredients

For Custard
2 cups whipping cream
2/3 cup unsweetened canned coconut milk
1/3 cup sugar
6 ounces semisweet chocolate, finely chopped
2/3 cup flaked sweetened coconut
6 large egg yolks
1 whole egg

For Topping
12 teaspoons sugar (2 teaspoons per custard)

Method

Preheat oven to 325 degrees F. Place three crème Brulee dishes in each of two 13X9X2-inch baking dishes (or whatever you have that fit your dishes, I needed three random baking dishes). Mix cream, coconut milk, sugar and flaed coconut in heavy medium saucepan. Stir over medium heat until sugar dissolves and mixture comes to a simmer, add chocolate and mix well until combined. Cover pan, and reduce heat to a very low simmer (or turn off after 5 minutes) and let sit for 10 minutes to infuse flavors. Pour mixture through a strainer into a large measuring cup.

Making the custard (Crème):
Whisk egg yolks in a medium to large bowl with whole egg until well blended. Temper the egg yolks but whisking quickly and slowly pouring a small amount of the chocolate mixture into the eggs. Mix thoroughly before adding more of the chocolate mixture. After a few mixes you can dump the rest of the chocolate mixture into the large bowl. Whisk until mixed thoroughly. Return custard to measuring cup. Divide among dishes. The custards do not rise so you want them poured fairly full. Pour enough hot water into pans to come halfway up sides of dishes. I pour a little in then place the pan and dishes into the oven, and then pour the rest in to reach half way. Carefully transfer pans to oven and make about 30 minutes or until custards are almost set in the center when pans are gently shaken. Using a spatula carefully transfer custards in dishes to work surface or cooling rack. Cool 30 minutes. Chill at least 3 hours or up to 2 days.

Making the crunchy top (Brulee):
When ready to serve, sprinkle 2 teaspoons sugar evenly over each custard. Working with 1 custard at a time, hold Brulee torch so that the flame is 2 inches above the surface. Direct flame so that sug melts and brown, about 2 minutes. Keep the flame moving in a circular pattern to avoid burning the sugar in any one spot.


Tuesday, March 30, 2010

Frosted Carrot Bread


Now I know all of you (even those that say you can't cook) know at least one recipe.  This is my dear friend Kate's "one" recipe, or so she claims, I've seen her cook she just doesn't like it.  However when she gave me this recipe she said it was carrot cake.  Now I haven't told her but I have to disagree.  It was much heavier than regular carrot cake, and it got firm on the outside and would not come out of the pan which to me says sweet bread.

I tried to make it in two pans to make a layered cake.  Do not do that.  It was not a good idea... unless you want to have nice little wedges like above or you want to share half your booty.  Kate however has never tried to remove it from the pan so could not warn me.  She makes it in a 9X13 rectangular pan, frosts it in the pan and serves it from there.  Which is pretty much how we ended up.  It really doesn't matter what you call it, it was awesome.  The first pan didn't even make it to the frosting stage. 

The only thing I changed for this recipe was to make a maple cream cheese frosting instead of Kate's frosting because her recipe said... a box of confectionary sugar.  She didn't know how much was in a box, and we don't have boxes at our grocery stores (none of them) it's all bags, so I threw the maple one on, which was also not a good idea as it was a delicate frosting for a serious cake/bread (cread?)  So....either serve this as is, or top with your own favorite cream cheese frosting,unless you know how much sugar is in a box then let us know. 

PS... this was awesome for breakfast with coffee, but that doesn't really put it into a category either because cake is good with coffee too, unless you don't like sweet things for breakfast.  However the only thing sweeter than the cake was my minature helper.  Notice the tiny hands dumping in ingredients and the proud little chef waiting to put his cake in the oven.


Kate’s Carrot Cake

Ingredients

Cake

2 cups flour
2 cups sugar
2 cups coconut shredded
2 teaspoon baking soda
2 teaspoons cinnamon
1 teaspoon salt
3 large eggs, slightly beaten
1 ½ cup oil
2 teaspoons vanilla
8-9 ounces crushed pineapple with juice
2 cups shredded carrots
2 cups chopped walnuts (I left these out since the baby was going to be eating it)
1 cup raisins
Frosting

2 sticks butter
6 ounces cream cheese
1 box powdered sugar

Method

Preheat oven at 375 degrees. Mix dry ingredients in a large bowl. In a small bowl mix eggs, oil, vanilla, pineapple with juice, and carrots. Combine two bowls, mix well. Mix in walnuts and raisins. Pour batter into greased 9 X 13 pan. Bake for 45-50 minutes. Take cake out of oven and cool on rack. Frost with frosting (or not).

Sunday, January 24, 2010

Peanut Butter-Chocolate Fondue


This weekend we had friends over for fondue, figuring it would be a quick throw together meal.  Not so much.  I had never prepped three courses of fondue before and cutting everything up takes longer than you would think.  We started with a cheese fondue, a coq au vin fondue for the main course, and then peanut butter chocolate fondue for dessert.  I'll post the cheese fondue later but don't you always wish you could just start with dessert?

Anyone that has ever had chocolate fondue knows how amazing it is when you dip your cold fresh strawberry into the molten chocolate, but imagine dipping it into a liquid peanut butter cup.  This is by far the best dessert fondue I have had to date.

Peanut Butter and Chocolate Fondue


Ingredients

1 cup (6 ounces) semisweet chocolate chips
1/2 cup sugar
1/2 cup milk
1/2 cup creamy peanut butter

Dippers: we used banana slices, halvedries, cheesecake, chocolate wafers, grahm crackers, marshmallows
Method

In a heavy saucepan, cook and stir the chocolate chips, sugar, milk
and peanut butter over low heat until smooth. Transfer to a fondue
pot and keep warm. Serve with bananas and strawberries, and other things you plan on dipping.

Yield: 12 servings.

Twist on a s'more.  Chocolate wafer, marshmallow peanut butter chocolate, and banana.

Thursday, November 26, 2009

Pumpkin Creme Brulee


I love the holiday season, Halloween, Thanksgiving, and Christmas. All those sweets and traditional foods, yet there are times when a tradition calls for an update. About four years ago my husband swapped out old traditional Stove Top Stuffing that I grew up with for a Ciabatta, Chestnut, Prosciutto, stuffing, and needless to say we have never gone back. I mean seriously, high quality, super flavor ingredients for a box of shriveled up pieces of what is supposedly bread? There is no comparison.

This year’s swap came in the dessert department. Every year we have to have Apple Pie for my daughter. For some reason it's not Thanksgiving without Apple Pie for her, I don't really think Apple Pie screams Thanksgiving for many people (not to me at least aside from her association) but what does say Thanksgiving dessert to many, many people is Pumpkin Pie.

When I was younger I was always a Pumpkin Pie for Thanksgiving dessert girl.  Now that I am older and can (and do) make Pumpkin Pie in the fall it feels kind of like a repeat at Thanksgiving. I know I could just not make it in October but really, I have no will power.

Enter the new Thanksgiving dessert.... ta da da daaaaaaaaaaaaaaaaaaa.... Pumpkin Crème Brulee. Yum! I really didn't make any changes to the recipe, and I have no idea what size my crème brulee cups are, but this did not come close to making 8 of any size, so I've adjusted the serving to six, but honestly I think it might be more like 4. I tried to make 8 and they came out very thin, too thin. Next time I will fill them twice as full and just make the four.  Note to readers... my 18 month old literally licked his plate on this one.


Pumpkin Crème Brulee
Adapted from Emeril

Ingredients

2 cups heavy cream
1/4 cup light brown sugar
1/4 cup sugar, plus 4 teaspoons
8 large egg yolks
1/2 teaspoon pure vanilla extract
1/4 teaspoon ground cinnamon
1/8 teaspoon grated nutmeg
1 cup mashed cooked pumpkin

Instructions

Preheat the oven to 325 degrees F.

Arrange 4 (6, or even 8 if you know how big your cups are) (1/2-cup) ramekins or custard cups in a large metal baking pan.

In a medium saucepan, combine the cream, brown sugar, and 1/4 cup granulated sugar. Bring to a bare simmer over medium-high heat, stirring to dissolve the sugar. Remove from the heat.

In a medium bowl, whisk the egg yolks until frothy and lemon-colored. Slowly add 3/4 cup of the hot cream mixture, whisking constantly. Add the egg mixture to the remaining hot cream, and whisk. Add the vanilla, cinnamon, nutmeg, and pumpkin, and whisk until smooth. Strain through a fine mesh strainer into a large bowl. Divide among the prepared custard cups.

Add enough hot water to come halfway up the sides of the cups. Bake until the custards are just set in the center but not stiff, 45 minutes to 55 minutes. Remove from the oven and refrigerate until well chilled, at least 3 hours or overnight.

Sprinkle each custard with 1/2 teaspoon of the remaining sugar. Using a kitchen torch, caramelize the sugar. (Alternately, preheat the broiler, and broil until the sugar melts and caramelizes, watching closely to avoid burning and rotating the cups, about 1 to 2 minutes.) Place on small dessert plates and serve.

Yield: 6 servings

Wednesday, September 30, 2009

Chocolate-Pumpkin Swirl Brownies

I have been very busy this week with the end of my first class, however, I have my study group coming over tonight which was a perfect excuse to make this recipe.  I would highly recommend using canned pumpkin for this one.  For some reason when I pureed the fresh pumpkin little chunks did not break up, and while that may be able to hide in say a pie, not so much in a brownie.  I am hoping no chunks made it into the brownies I dropped off at the babies daycare this morning.  Happy eating.

Chocolate-Pumpkin Swirl Brownies


Martha Stewart Halloween 2004
Makes 16

Ingredients

8 tablespoons (1 stick) unsalted butter, plus more for pan
6 ounces bittersweet chocolate, chopped
2 cups all-purpose flour
1 teaspoon baking powder
1/4 teaspoon cayenne pepper
1/2 teaspoon salt
1 3/4 cups sugar
4 large eggs
1 tablespoon pure vanilla extract
1 1/4 cups solid-pack pumpkin
1/4 cup vegetable oil
1 teaspoon ground cinnamon
1/4 teaspoon ground nutmeg
1/2 cup chopped hazelnuts or other nuts


Method

Preheat oven to 350 degrees. Butter a 9-inch square baking pan or dish (I am thinking this is suppose to be 9X13, because I used a 9-inch and if you can tell from the photos I have brownie bread it is so thick). Line bottom of pan with parchment paper; butter lining.

Melt chocolate and butter in a heatproof bowl set over a pan of simmering water, stirring occasionally until smooth.

Whisk together flour, baking powder, cayenne, and salt in a large bowl; set aside. Put sugar, eggs, and vanilla in the bowl of an electric mixer fitted with the paddle attachment; beat until fluffy and well combined, 3 to 5 minutes. Beat in flour mixture.

Divide batter between two medium bowls (about 2 cups per bowl). Stir chocolate mixture into one bowl. In other bowl, stir in pumpkin, oil, cinnamon, and nutmeg. Transfer half of chocolate batter to prepared pan smoothing top with a rubber spatula. Top with half of pumpkin batter. Repeat to make one more chocolate layer and one more pumpkin layer. Work quickly so batters don't set.

With a small spatula or a table knife, gently swirl the two batters to create a marbled effect. Sprinkle with nuts.


Bake until set, 40 to 45 minutes. Let cool in pan on a wire rack. Cut into 16 squares.

Wednesday, September 23, 2009

Pumpkin Whoopie Pies


Welcome to the test kitchen! Well the temporary test kitchen, while I try out new pumpkin recipes this year. I enlisted some help for ideas on what type of pumpkin recipes to make. The first response was Pumpkin Whoopie Pies, which I immediately put on the list as the first thing to make.

This recipe was really easy. Getting the ingredients for this recipe? Not so much. Are you aware that there is a canned pumpkin shortage this year? Neither was I, but I am now. I went to the store to pick up my pumpkin and was met with a little sign that stated that due to a whole lot of rain at the Libby pumpkin patch there is no pumpkin. What? How can that be? How can there be no pumpkin this close to Halloween and Thanksgiving? And apparently Libby is the only supplier of pumpkin because there wasn't even an empty space on the shelf where the other brand of pumpkin should have been. I was lucky enough to spot a space on the very bottom shelf way in the back that had a few cans above the listing: Organic Pumpkin Puree, $1000. I snatched up the last two cans. I am a fan of organic stuff and I figured the time it would save me would make it all worth it. And it might have... please continue.

I got home and went about my directions until I got to the part where I was to add the pumpkin. I opened the can and immediately knew that something was wrong. Where there should have been a lovely orange puree, with nice texture, there was a dark, sickly, runny, mess with large specks of spice. Not good! I picked up the can as I remembered that I had not actual read the label while at the store, and found exactly what I thought I would find.  Organic Pumpkin Mix!  $&#%! Pause. Breathe....................... breathe again........ *%^#^!

I continued my little number and symbol venting while I put my shoes on and went back to the store (make that three stores) with the baby in tow to find that no one has any pumpkin. Apparently Libby has a monopoly on pumpkin, which should be illegal! Just saying.

So I went to the produce section and there they were. The little pie pumpkins. I cracked and decided it really would be easier to just make my own, plus I was halfway into the recipe already and I really wanted a pumpkin whoppie pie. I picked up the small pumpkin and began to load them into my cart but was interrupted by chubby little hands that really wanted the orange "ball". I handed one over and it was immediately held out over the floor, dropped, and saved (by me), and replaced in the cart, to the protests of "baaaaallll, ball, ball, ball." I spied a small yellow and green gourd that looked a lot like a pumpkin and handed it over to delighted squeals. He carried his "pumpkin" with him all night giving it kisses, and trying to eat it like an apple, funny little person. He was very upset when we wouldn't let him sleep with it.

If you do not have time to roast your own pumpkin you can wait until October 1, when Libby has promised to grace the shelves of supermarkets everywhere once again with their canned pumpkin. However, it's not hard to roast it yourself. It took a little longer but now when I have grandkids and I propped them up on the chair next to me to make Pumpkin Whoopie Pies at Halloween I can break out the Great 2009 Pumpkin Shortage story. I'm thinking of throwing in an uphill walk in a snowstorm to fight my way through crowds to get the pumpkin just for a little spice.


How to Roast a Pumpkin:

Preheat oven to 350 degrees. Line a rimmed cookie sheet with foil or parchment paper. Cut off the tope part of the pumpkin, cut pumpkin in half. Remove seeds and nasty stringty stuff. Place pumkin cut edges down so you have a little pumkin cave or sorts. Cook for about an hour or until the flesh of the pumpkin is soft. (someone do a pumpkin word count on this post and get back to me). Remove the pumkin from the oven and flip over so that the cut side is now facing up so it can cool.

When cooled enough to handle scoop out the flesh. I put mine just like that in the refridgerator overnight since I was running out of time thanks to the trip to the store. Then I pureed it the next night and baked with it. If the puree is too dry add a tiny bit of water until it is smooth. If it is too wet, bring to a boil on the stove in a pot. Still too wet, strain through cheesecloth. If you bake the pumpkin instead of boiling it, it probably won't be too wet. Voila! See? Easy.


Pumpkin Whoopie Pies with Cream Cheese Filling
Adapted from Matt Lewis of Baked Bakery

Ingredients

Cookies
3 cups all-purpose flour
1 teaspoon salt
1 teaspoon baking powder
1 teaspoon baking soda
2 tablespoons ground cinnamon
1 tablespoon ground ginger
1 tablespoon ground cloves
2 cups firmly packed dark-brown sugar
1 cup vegetable oil
3 cups pumpkin puree, chilled
2 large eggs
1 taspoon pure vanilla extract
Filling
3 cups confectioners' sugar
1/2 cup (1 stick) unsalted butter, softened
8 ounces cream cheese, softened
1 teaspoon pure vanilla extract

Method

Cookies
Preheat oven to 350 degrees. Line two baking sheets with parchment paper or a nonstick baking mat; set aside.

In a large bowl, whisk together flour, salt, baking powder, baking soda, cinnamon, ginger, and cloves; set aside. In a LARGER bowl, whisk togehter brown sugar and oil until well combined. Add pumpkin puree and whisk until combined. Add eggs and vanilla and whisk until well combined. Sprinkle flour mixture over pumpkin mixture and whisk until fully incorporated.

You can use a small ice cream scoop here with a releasing mechanism, (but I just used heaping tablespoons to make smaller pies). Drop heaping tablespoons of dough onto prepared baking sheets, about 1 inch apart. Transfer to oven and bake until cookies are just starting to crack on top and a toothpick i nserted into the center of each cookie comes out clean, aobut 15 minutes. Let cool completely on pan.

Filling
Sift confectioners' sugar into a medium bowl; set aside. In the bowl of an electric mixer fitted with the paddle attachment, beat butter until smooth. Add cream cheese and beat until well combined. Add confectioners' sugar and vanilla, beat just until smooth. (Filling can be make up to a day in advance, bring to room temperature before using).


Assemble the whoopie pies: Line a baking sheet with parchment paper and set aside. Transfer filling to a disposable pastry bag (or a plastic sandwich bag like I did, works the same and you probably have one of those) cut the end off the bag (or the corner of the sandwich bag). When the cookies have cooled completely, pipe a large dollop of filling on the flat side of half of the cookies. Sandwich with remaining cookies, pressing down slightly so that the filling spreads to the edge of teh cookies. Transfer to prepared baking sheet and cover with plastic wrap. Refrigerate cookies at least 30 minutes before servings and up to 3 days.

Makes 18 small or 12 large pies

Sunday, September 20, 2009

Honeyed Fig Crostatas


It is Fig season, and I have never cooked with Figs before this year. I did find some very cute mini green figs a little while ago, which I quickly smothered in goat cheese, topped with honey and popped in the oven. Which was good, but this time I wanted to try something different.

So how convienent that I went to my mailbox and found a subscription to Food and Wine. A surprise little gift from my fantastic foodie brother-in-law that shares my love of new recipes and yummy ingredients. Thank you Robert, I promise to make you something tasty when you visit.

I have no quirky stories to go with this recipe since I have stumbled through this last week in a frantic dance of being late, and not having enough time to breath. Thankfully this recipe came together in about 5 minutes and there were no unexpected surprises (stay tuned for the Pumpkin shortage of 2009 for next weeks post).

The Crostata recipe was very yummy (cannot even be creative in my descriptions tonight sorry) and was a nice compliment to the light fruit. The one issue I had was with the thyme, I’m not sure what that was supposed to do but it tasted way to earthy for the rest of the flavors for me. I would leave it out; I’m actually thinking maybe black pepper next time instead… I will have to do a little research on whether or not those two flavors will mesh. Should be easy when my Flavor Bible shows up this week, just ordered it via suggestion from the Gluten-free Girl, and I’m also thinking I will retry this with apple and on a separate Crostata raspberries…. Totally predictable I know. Enjoy.

Honeyed Fig CrostatasAdapted from Food and Wine October 2009
Ingredients

2 1/2 cups all-purpose flour
1/4 cup plus 1 tablespoon sugar
Kosher salt
1 1/2 sticks cold unsalted butter, cut into 1/2-inch pieces
1/4 cup plus 3 tablespoons ice water
1 1/2 pounds fresh green and purple figs, each cut into 6 wedges
5 teaspoons honey
1 teaspoon fresh lemon juice
1/4 teaspoon thyme leaves, plus small sprigs for garnish
1 egg beaten with 1 tablespoon of water


Method

In a food processor, pulse the flour with the sugar and 1/2 teaspoon of salt. Add the butter and pulse until it is the size of peas. Add the water; pulse until the dough comes together. Pat the dough into a disk, wrap in plastic and refrigerate for 30 minutes.

On a lightly floured surface, roll out the dough 1/8 inch thick. Cut out eight 5-inch rounds, rerolling the scraps if necessary; transfer to a parchment paper–lined baking sheet and refrigerate for 30 minutes.

Preheat the oven to 375°. In a bowl, toss two-thirds of the figs with 3 teaspoons of the honey, the lemon juice, thyme leaves and a pinch of salt. Arrange the figs on the dough rounds, leaving a 1/2-inch border all around. Fold the edges over the figs and brush the dough with the egg wash. Chill for 30 minutes.


Bake the crostatas for 35 minutes, rotating halfway through baking, until the crusts are golden. Let stand for 10 minutes.

Gently toss the remaining figs with the remaining 2 teaspoons of honey. Transfer the crostatas to plates, top with the figs and thyme sprigs and serve.
 

Sunday, September 6, 2009

Mascarpone Gelato with Macerated Berries


I would like to welcome back my friend Alex from her honeymoon with her new husband, Kevin. They spent ten days in Italy, lucky ducks. Here's a little recipe to remind you of the Italia when you miss it. Welcome home and congratulations.

And now on to my slightly less exciting life. One of my new favorite things to do after dinner, when the baby has been fed and bathed, smelling great and being all cute in his jammies, is to strap him into the stroller and take the 30 minutes walk to the local co-op. I get an hour worth of walking in, the baby gets some fresh air, and we come home with yummy food. A win all around I would say. Just this past week on one such walk I found freshly picked, local, organic raspberries, and farm fresh eggs. Both of which I snatched up greedily. Only when I went to pick up the eggs, they were the smallest eggs I have ever seen. Or they seemed to be, I don’t remember Vermont farm eggs being so tiny. I mean seriously they were cute. See?
On the left is the farm egg and on the right is the leftover grocery store organic egg from the refrigerator (there is actually more of a size difference than is apparent in the photo). Doing a quick calculation in my mind, I decided I would need three eggs for any recipe that called for two. Meaning if I grabbed a dozen I would only have enough for four recipes. That doesn’t last long around our house despite my lack of baking skills (I still blame our stupid little oven, more on that to come at a later date.) so I decided I would get two dozen. Which seemed like a completely logical idea to me, until I got home and my husband asked what we were going to do with two dozen eggs.
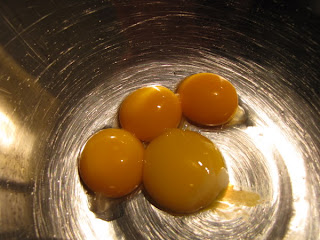
Little did he know how amazing fresh eggs are. I won’t bore you with my rambling about fresh eggs, but if you’ve never had them they are a completely different experience than the bland, rubbery stuff you buy in the grocery store. They are flavorful and tender and crumbly. They aren’t even the same color as grocery store eggs… and now I’m going on. So back to the what to do with the egg dilemma. We had left over ciabatta rolls from the pulled pork so my husband made us bird in a nest with fresh cheddar and bacon and those were so good, but he laughed that it took two birds to fill the tiny nest, when normally it would only take one… might my calculations have been off? *Note to self, possibly two farm fresh eggs = one nasty grocery store egg.

Then there were the raspberries. Oh raspberries (insert image of grown woman doing the happy dance here)… how I love thee. I mean I really LOVE raspberries. They are my favorite food in the world. When I get those stupid questions like what would I eat if I could only eat one thing for the rest of my life…. I usually answer cheese, because that is my indulgent food, but honestly I would pick raspberries over cheese. That is a collective gasp of shock you hear from my friends and family who know me fondly as a cheese-a-holic. This recipe however could be the best thing in the world because it combines my two loves above with…… ready for it….. ice cream! Well Gelato to be exact but to be honest I can’t seem to get a straight answer from anyone or even the web as to what constitutes the difference between gelato and ice cream other than some sketchy information about air content. Some say gelato contains no egg, and other recipes that claim to be ice cream have no egg so does that make that really a gelato? Then some say cream versus milk but again I found both nomenclature with both cream and or milk. Since I am using an automated little ice cream maker I have no control so I suspect the “ice creams” and “gelatos” I make both have about the same amount of air in them, so we’re just going to play along and call this a gelato since that is what the original recipe called it.


This recipe is adapted from Emeril’s Marscapone Gelato with Macerated Strawberries. The only difference other than the obvious swap of berries was that I halved the amount of marscapone from his 16oz. to 8oz. Partly because I just wrote marscapone on my grocery list not noting how much I would need (they come in 8oz containers, and I only bought one) and partly because this weeks blog was suppose to be Avacado gelato, which I had heard was fantastic but really just ended up tasting like frozen guacamole, so I didn’t want the marscapone flavor to be too strong. I also added the vanilla where his recipe didn’t have any. And my finally adjustment was to add 5 egg yolks instead of 4 because of their miniature nature, I probably could have gotten away with 6 but I figured egg flavored gelato would probably be as tasty as frozen guacamole so I went light. Here is a regular yolk next to the original three to see how many of my little orange beauties would make up one large yolk.

Mascarpone Gelato with Balsamic-Macerated Strawberries

Adapted from Emeril on Food Network
Ingredients

1 container raspberries
2 tablespoons balsamic vinegar
4 tablespoons sugar
1/2 cup simple syrup (boil 2 parts water to 1 part sugar until dissolved)
4 egg yolks (or 5 mini farm fresh yolks)
8 ounces mascarpone
1/4 cup light corn syrup
1 cup milk
2 tablespoons lemon juice
1 teaspoon good quality vanilla extract (if you go to put it in and it says imitation vanilla... throw it in the garbage and go to the store and buy some real vanilla extract)

Method
In a small, non-reactive bowl toss raspberries with balsamic vinegar and sugar and set aside to macerate while you prepare the gelato.


In a metal bowl whisk together simple syrup and egg yolks, set the bowl over a pan of simmering water and whisk continuously until the mixture reaches the ribbon stage (thick, pale yellow and forms a ribbon when the whisk is lifted). Mine got REALLY foamy first so if it does that and still thickens don’t worry.

Remove the bowl from the heat, transfer to the bowl of an electric mixer and beat at low speed until cool. Whisk in the mascarpone, corn syrup, milk, vanilla, and lemon juice and strain mixture through a fine sieve.


Chill thoroughly, then process in an ice cream machine according to manufacturer's directions.

Serve with macerated berries.


This is a seriously rich dessert, but it is not horrendously sweet and the raspberries were fantastic. If you’ve never had balsamic and berries before be brave and try it, it’s not what you think. It was just yummmy.... and only made me want to go to Italy more, if only to ask.... What the hell makes it gelato?