Showing posts with label vegetarian. Show all posts

Sunday, July 25, 2010

Beat the heat.... Roasted Red Pepper Soup

Yes, I do realize these are tomatoes and not peppers... keep your pants on they're coming

It's hot.... it's TOO HOT!  I know there are some people that make an honest effort about never complaining about the weather, because they wanted it to be hot all Winter.  I am not one of those people.  There are days (this year there are many days) that are just too stinking hot and no amount of frigid winter weather (that is long forgotten by July) will ever make me forget that a heat index of 115 and 1000% humidity is WAY TOO HOT!

Especially when you are faced with the task of feeding a few faces every night in said heat and humidity.  What to make when the mere thought of boiling water raises the temperature in your micro-kitchen a few degrees?

Step 1:  Forget everything you know about what should constitute a well rounded meal.  You feed your family normal meals approximately 328 days a year.  This number is completely pulled out of the air and has no statistical relevence whatesoever but I assume it gives enough room for two weeks of too hot to cook days in the summer, and the rest is filled with things out of desperation, like chicken nuggest, and fast food drive through.  Anyway.... a couple of days with some random food stuffs isn't going to cause malnutrition.


fruit salad sneaks in all the goodie phytochemicals in, when served with lemon-ricotta pancakes your youngest child will promise to never put you in a nursing home

Step 2:  Buy a pre-cooked roaster chicken from the grocery store, a block of good quality cheese (make sure it is pasturized, not a soft mold ripened cheese, or goat cheese if you're pregnant.  Hey it sucks but it's science, it could do some serious damage to your developing child.  NO that is not opinion.  Listeria is is a scientifically proven fact, want to be scared...do a google.  Stay away until after delivery.  Trust me that is easier said than done for me.  If you're doctor says it's okay I recommend getting a doctor that didn't fail Microbiology), a loaf of decent bread, a jar of pickles, a jar of olives, and a tomato and/or cucumber.  Take all the meat off a chicken, put the bones in a bag in the freezer for later stocks.  Throw everything else on a plate (maybe you help the ones under 4 with the knife) and voila.  Meal 1 accomplished.


Step 3:  Realize you cannot feed your family or yourself a bunch of cheese, pickled items, and cold chicken for the next two weeks.

Step 4:  PANIC.

Step 5:  Find other heat friendly meals that aren't just salad.

Step 6: Use this post as a way of sneaking in your mother-in-laws amazing Roasted Red Pepper Soup, and fulfill the request of one of your friends for the recipe at the same time... sneaky, sneaky.


I never got a chance to take a final pictures, you know with the heat and all, so that is another reason I am sneaking it into this post.  I'm not sure if hot soup sounds like a good idea to some of you when it's hot outside, but honestly I love soup any time, and as long as whatever it is I'm cooking doesn't make the inside temperature of my kitchen, match the outside temperature, it's all good!

Roasted Red Pepper and Potato Soup

The Mother-in-Law's Recipe
Ingredients

*5 large red bell peppers
1 large yellow onion, chopped
3 cloves garlic, minced
¼ cup butter
8 cups (2L) chicken broth  (can substitute veg. broth for a vegetarian version)
4 medium potatoes, peeled and diced
1/3 cup finely chopped basil
Dash of Angustura bitters (find this with the alcohol drink mixers)
Freshly ground pepper to taste

Method

Wash peppers and leave them whole. Place them on a hot barbecue grill or under the broiler and cook until the skin closest to the flame or element is charred and bubbly, about 5 minutes. Using tongs to turn the peppers, continue charring until skin is blackened on all sides. Remove from heat and put into a paper bag. Close tightly and let sit about 10 minutes or until the skin peels easily. Remove all the skin and seeds and dice flesh. Melt butter over medium-low heat and add the onion and garlic. Saute for 10 minutes or until the onion is translucent. Add the red peppers and chicken broth, cook for 10 minutes. Add the potatoes and cook an additional 15 minutes.

Puree the soup in the blender and return to the pot. Add the basil and Angostura bitters. Bring to a simmer over medium heat, stir well. Remove from heat. Add salt and pepper to taste.

* Can substitute jarred roasted red peppers. Wash them well and remove any charred skin before chopping.  However which would you rather eat?  The right is a pile of sad, droopy jarred peppers that I keep on hand for those days that I don't have the extra 2 minutes to roast a fresh one, or say have used a couple of red peppers because I forgot they were marked for soup.  And the left is a freshly roasted pepper.  There is no comparison really.

Monday, May 3, 2010

Oh the joy of finals and Smitten Kitchen

If you've been paying attention you would know that it is finals week.  And while that wasa nightmare back as an undergraduate, as a graduate/working full-time/Mother and wife.... it's a little ridiculous.  I'm trying to be a more positive person so I will just say.... I am out of time. 

However I am still on my no processed foods kick and I don't think the family should go hungry just because I'm busy and neither should you.  PS... look at the food you get to eat when you give up frozen chicken nuggets and tater tots

Some kind of Spanish dish my husband made for us when I had class last Saturday... yum


Apples that are bigger than your head


Lumpias from the Farmer's Market, which I now will have to make after finals are over


Pico di Gallo, an accompaniment to the Carna Asada Tacos


Green Juice every morning for antioxidants and energy... it's actually pretty good... the baby likes it, bad photo but you get the idea... it's green

and finally..... the one meal I've actually made other than vats of green juice...

Shakshuka.... OMWord....

Shakshuka takes very little time to make, was a  big hit, was a little something different for brunch but could easily be a dinner egg dish, and was A- MAZING as almost all things Smitten Kitchen are.  I love that blog, I cook from it just about every week, but I didn't make this dish to actually blog it was just fantastic and the meal that sticks out for me from this week.  Please click this handy little link to bring you to the recipe.
Besides it's just fun to say.

So if you think eating all fresh food is really difficult take a look above while I smile and say... oh yeah... it's rough.

Deb from Smitten Kitchen says to serve this with pita... .which is easy for her to say, she lives in NYC.  You can get pita anywhere.  We live in the middle of nowhere with limited Greek and Middle Eastern places, and the husband couldn't find a decent pita (he's from Montreal, he knows his pita).  However, I did have this bread left over from the Farmer's Market the day before.  I toasted it lightly at 350, drizzled it lightly with olive oil, threw some ripped up golden oregano from my new planter courtesy of Nelly's Nest... which I would link here if my friend would get off her bum and make a link for her antique store, and then grated some fontina and threw it back in the oven... which I then promptly forgot I had made so you can see it's a little overcooked but still tasted fabulous... and now I can't image eatin the Shakshuka any other way.

Friday, April 9, 2010

Scalloped Potatoes with Creme Fraiche


Apologies.  Apparently I didn't take many photos while cooking on Easter.  However, I baked these in a rose colored pyrex dish so they didn't look so hot when they came out of the oven.  Brown on pink... not good colors for a potato.  And I almost broke a promise.  I promised I would post this by the end of the week and here it is Friday.  This was the side we served with the lamb, and while not quite the same type of flavors I thougth they went together just fine, and it was a great excuse to make home made scallop potatoes for the first time.  Why would anyone make them from a box when they are this easy?  However, I never knew they were this easy, but now I am passing on that little tid bit to you.... they are easy.  Make these tonight!


Scalloped Potatoes with Creme Fraiche
Recipe courtesy Food Network Magazine

Ingredients

2 cloves garlic, smashed
3 tablespoons unsalted butter
3 pounds waxy potatoes (such as Yukon gold or Yellow Finn), peeled (I didn't peel them because I was lazy)
3 cups half-and-half
1/2 cup creme fraiche
2 tablespoons all-purpose flour
2 teaspoons chopped fresh thyme
1/8 to 1/4 teaspoon ground mace
Kosher salt and freshly ground pepper
1/4 cup chopped chives

Directions

Preheat the oven to 350 degrees F. Rub the garlic all over the inside of a 3-quart baking dish, then mince it. Grease the dish with about 1/2 tablespoon butter.

Slice the potatoes about 1/8 inch thick (a mandoline works well, however if a potato gets lodged in the blade, just keep slicing.  If you try to remove said potato this is where you stop, bandage your finger, throw out your potato, sterilize your mandoline and hand it over to your husband to finish). Combine in a large saucepan with the minced garlic, the remaining 2 1/2 tablespoons butter, the half-and-half, creme fraiche, flour, thyme, mace, 2 1/2 teaspoons salt, and pepper to taste. Bring to a boil over medium-high heat and cook, stirring, until the mixture thickens slightly, 1 to 2 minutes. Stir in the chives and transfer the mixture to the prepared baking dish, shaking it to distribute the potatoes evenly. Bake, uncovered, until the potatoes are fork-tender, about 1 hour 5 minutes, occasionally spooning some of the liquid over the top. Let cool 10 minutes before serving.

Sunday, February 28, 2010

Cornmeal-Blueberry Pancakes


This is what I was dreaming about when I woke up this morning.  However reality set in when I remembered the plan was to go grocery shopping after breakfast and I was missing buttermilk and eggs.  So off to the local diner for a quick breakfast and a trip to the grocery store.  I may have to make these tomorrow using raspberries just to see if it works out.  When I made this batch I used blue cornmeal because it was what was in the house, however I think yellow or white would actually look better.  There is a little something unnerving about blue food.  Sprinkle with maple or vanilla sugar if you have it and load it up with real maple syrup.  Yum!


Cornmeal-Blueberry Pancakes

Ingredients

2 cups frozen blueberries
3 tablespoon unsalted butter
1 ½ cups stone ground cornmeal (I used blue because that’s what I had)
1 cup pastry flour (I used all-purpose)
2 tablespoons sugar
2 teaspoons baking powder
½ teaspoon baking soda
¾ teaspoon salt
1 large egg
1 lemon
2 cups buttermilk
¼ cup water
Cooking spray

Method

Rinse the blueberries in a colander to help them thaw. Spread on a paper towel, pat dry, and set aside to finish drying.

Melt the butter and set aside to cool.

In a large bowl, whisk together the cornmeal, flour, sugar, baking powder, baking soda and salt. In a separate bowl, lightly beat the egg. Finely grate the zest from about three-quarters of the lemon and add to the egg. Whisk buttermilk, water and melted butter into the egg mixture. Make a well in the center of the dry ingredients and pour in the wet ingredients. Gently stir until just combined. If mixture is very thick, add 2 to 4 additional tablespoons of water.

Preheat a large skillet on medium-low to medium heat. Coat generously with cooking spray. Pour 1/4 –cup portions of batter into skillet, spreading slightly if needed. Dot pancakes with blueberries. Cook until bubbles begin to appear in batter and bottoms of pancakes are golden brown. Flip and cook until opposite sides are golden and pancakes are cooked through. Coat with additional cooking spray for each bath. Serve right away with maple syrup.

Made 18 pancakes

Thursday, February 25, 2010

Wisconsin Cheese-Trio Fondue


I am waiting as we speak for the man to call me to tell me he is bringing my oven home.  I feel like I have been without it for 100 years!  That may be a slight exageration.  100 years... 2 weeks... give or take a day.  Whatever, it's been a while and my body is begining to protest to the junk I have been eating.  Not to mention I don't like to leave large electrical plugs bare for the children or animals to touch.  It's one thing to be without an oven, it an entirely different thing to worry about your cat electrocuting itself on a nightly basis.  It has been stressful.  More stressful is that they cannot figure out what is wrong with it.  It worked perfectly for them... of course!

I hope it works for me because I just received my copy of ad hoc at home, I know I know... that's sooo last year, but I have issues spending $50 on a cookbook.  Especially when I heard that the average number of recipes one cooks out of a cookbook is 3-5.  Of course that does break down to about $10 a recipe... that's so bad when you are talking Thomas Keller.  Really not so bad considering I already tried out the Fennel Mustard recipe... lovely, and the chocolate brownies... DIVINE!  I can't wait to cook up some homestyle comfort food.

Until then, we must make due with food that does not require an oven.  I realized I never gave you the recipe for the cheese fondue from the fondue night.  This is AMAZING.  I use all caps because I am shouting at you.  YOU MUST TRY THIS.  Seriously I think I would have licked the pot if there hadn't been company present.


Wisconsin Trio Cheese Fondue

Ingredients

6 oz. shredded Butterkäse cheese, [can be found at Whole foods, but you can also substitute Gouda
          if you can't find Butterkäse, I found Beerkäse and used that].  Always measure cheese by weight.
6oz. shredded Fontina Cheese (6oz)
3 Tbsp flour
¾ cup white wine
¼ cup dry sherry
2 tsp chopped shallots
1 tsp freshly ground black pepper
2 oz. crumbled blue cheese
2 Tbsp chopped scallions

Method

Toss the Butter(Beer)käse and Fontina cheese with the flour in a bowl. Place a metal bowl over a saucepan filled with 2 inches of water. You may also use a conventional double boiler. Bring the water to a boil over high heat. Reduce the heat to medium and pour the wine and sherry into the bowl. Sit in the shallots using a fork. Cook for 30 seconds, stirring constantly.

Add half the cheese blend and cook until the cheese is melted, stirring constantly. Add the remaining cheese blend a small amount at a time, stirring constantly in a circular motion after each addition until the cheese is melted. Fold in the pepper and Blue cheese. Pour into a warm fondue pot and keep warm over low heat. Garnish with the scallions.

NOTE: The cheese is shredded and tossed with flour to aid din thickening and to improve the viscosity of the fondue. The fondue should be the consistency of warm honey when completed. Monitor the cheese carefully as it is being added. Not all of the cheese may be needed, and, in some cases, more cheese may be needed to reach the perfect consistency.

Recommended dipping accompaniments: Variety of breads (however not the pecan one that I tried.  Cheese goes with many thing, but not cinnamon... ewww.  Thought it was just a nut loaf.), green apples, mixed vegetables.

Thursday, February 11, 2010

Spicy Pickled Eggs


I posted photos of the last time I made pickled eggs, and while much prettier they were sweet. I am not a person who really believes that sweet and egg is a fabulous flavor combo. In fact I prefer to keep sweet and protein separate. I do not like pineapple on my ham, I do not like sweet and sour anything and I most certainly do not want to see an apple or an orange segment in my chicken salad... gag.

Having vented let me just say finding a recipe for Spicy Pickled Eggs sounds easier than it is. Back in Vermont you can find these little guys at bars, hunting camps, and even corner stores. Out here in the Midwest I have yet to see a pickled egg outside of my fridge. Although they think putting gravy on fries is odd out here too so there you go.

I could not find a recipe that sounded anything like what I wanted to make, okay that is a small lie... I found one and promptly lost it and could not find it again, so I had to improvise. Here was the recipe I came up with.


Spicy Pickled Eggs
adapted from my brain

Ingredients

1 dozen eggs, hardboiled, cooled and peeled
2 cups apple cider vinegar
4 oz. hot sauce
12 oz. jar hot jalapeños, with juice
2 bay leaves
1 cup water
1/2 teaspoon garlic powder
3 teaspoon salt
1 small onion, quartered
handful of baby carrots whole
dash of mustard seed
dash of dill weed

Method

This is a revision from the way I did it. I placed everything in a pot and boiled it until the salt dissolved. I do not recommend putting jalapeño juice or hot sauce in vinegar before you boil it. It is effectively macing yourself repeatedly for period of time.

Placed cooled eggs in jar along with your vegetables, jalapeños with juice, mustard seed, and dill weed.

Place water, vinegar, salt, bay leaves, and garlic powder in pot. Boil until salt dissolves. Cool to room temperature. Add hot sauce. Mix thoroughly. Pour into jar until all eggs and veggies are covered. Place cap on. Shake. Place in the refrigerator for 30 days. Test. I have heard they are good for up to a year... but ewww. Being that it does take a minimum of a week I haven't tested these out yet, but they don't appear too different from all the recipes people love so I am hopeful. I'll keep you posted.  PS... I also used two jars.  One large emptied pickle jar and this mason jar. Give the jars a little shake whenever you think about it while they are developing their flavor.

Friday, January 29, 2010

Lentil Soup that was suppose to be Lentils which was suppose to be Lentil Soup


When you read blogs you think everyone is highly creative and individual. When you start blogging you quickly realize anything you want to blog has been done before, and possibly better. I used to think I stole all of my blogging ideas from Smitten Kitchen's blog but now I realize the woman has just cooked EVERYTHING... even recipes I do not get from her are still on her site from year's before I even thought of making it.

There also tends to be trends for what kinds of foods are cooked.  I recently made corneal-blueberry pancakes and found at least three other blogs featuring them.  This is probably why blogs that feature original recipes do so well.  I have a few up my sleeve, I just need time to make them since they are from my pre-baby, pre-Master, pre-no time days.  The latest trend has been lentils, lentils, everywhere....

So this recipe is semi-mine and came about from a desire for lentils, and a desire to use my new slow cooker.  I've told you all about the slow cooker of course... No?  Well pull up a seat li' darling and have a listen.

Until recently I had a horrible reaction to slow cookers.  Sure they are fine for chili or to melt a big vat of cheese for a dip or something along those lines, but for the past few years I have had a love-hate relationship, and by that I always say I hate that my slow cooker loves to burn my food!

I consider myself to have ample cooking skills.  I may not be ready to take on a restaurant or even a cook book of my own, but I am willing to bet that I cook more diverse things than the average person, not the average blogger mind you but the average person.

However, I have not cooked a successful slow cooker meal in years, and I finally know why!  It was the horrid slow cooker I had.  After burning one too many meals I decided to do an experiment.  I found a recipe that had great reviews.  I put it all together, and I came home two hours early to the smell of char.  It wasn't good.  I got on-line the next day and found hundreds of reviews complaining about the brand of slow cooker I had and that was it.  Out with the old in with the new.  And I now love my little slow cooker and want to try it out as much as possible.  Enter the lentil recipe.

I make a stove top Indian lentil recipe from my dear friend Dharini that I assumed I could make in the slow cooker.  Easy, high portein, low fat.  Yes!  I took the ingredients I put into that recipe and then searched for a slow cooker lentil recipe that I found on-line.  She had said she wanted lentil soup, put all this stuff into her slow cooker and ended up with lentils.  I thought perfect I merged it with my Indian recipe, dialed down the spice a little since I was told flavors intesify in a slow cooker, and when I was done... viola.  The lentil soup (minus any hint of Indian spice) the woman was going for.  It was simple, it was fast, it required only a mixing step so it was perfect, but it was not what I was hoping for, I also forgot to add the cilantro which makes something taste more Indian to me, since it ended up being just regular soup I suggest you leave it out too.

My husband, having no preconceived notions loved it, although it was a little salty so I deleted the salt from the recipe.  I also recommend using low-sodium broth, or what I've done here is 1 cup of better than bullion (super salty) made from the paste and the rest water.


Crock Pot Lentils

Ingredients

2 cup(s) dry lentils
1 small onion(s)
2 tsp McCormick Ground cumin
1 tsp ground coriander
3 clove(s) garlic clove(s)
4 oz Ortega Diced Green Chiles
1 teaspoon garam masala
1 teaspoon chili powder
1 teaspoon of Amchur powder
1 cup(s) vegetable broth
7 cup(s) water

Method

Rinse lentils with cold water until they run clear.  Mix everything together in a pot.  Cook on low for 8-10 hours, or high for 6 hours.


My first 4 week experiment in budgeting and lowering my carbon footprint has come to a close. Here are the results (averaged to the best of my memory because I am being oh so official in my tracking... really who has time).

Excuse the mess... I can't get a table in here yet. Must figure out how to use crazy things called computers one of these days.

Food Budget:

Never used to track but this month I was $150 over.  Just imagine how bad it was!  I can do better.


Going Green:

Non-biodegradable garbage bags:  From 34 to 18 much better
Biodegrable garbage bags: N/A  to still 0 (I forgot to pick them up)
Recycling pick ups: From 0 to 2
Disposable cups: 56 to 3 (YES! That's a good improvement)
Plastic grocery bags: From 60 to 4 (also a huge improvement)

Look at the impact one family can make in 4 months with minimal effort!

Sunday, January 24, 2010

Peanut Butter-Chocolate Fondue


This weekend we had friends over for fondue, figuring it would be a quick throw together meal.  Not so much.  I had never prepped three courses of fondue before and cutting everything up takes longer than you would think.  We started with a cheese fondue, a coq au vin fondue for the main course, and then peanut butter chocolate fondue for dessert.  I'll post the cheese fondue later but don't you always wish you could just start with dessert?

Anyone that has ever had chocolate fondue knows how amazing it is when you dip your cold fresh strawberry into the molten chocolate, but imagine dipping it into a liquid peanut butter cup.  This is by far the best dessert fondue I have had to date.

Peanut Butter and Chocolate Fondue


Ingredients

1 cup (6 ounces) semisweet chocolate chips
1/2 cup sugar
1/2 cup milk
1/2 cup creamy peanut butter

Dippers: we used banana slices, halvedries, cheesecake, chocolate wafers, grahm crackers, marshmallows
Method

In a heavy saucepan, cook and stir the chocolate chips, sugar, milk
and peanut butter over low heat until smooth. Transfer to a fondue
pot and keep warm. Serve with bananas and strawberries, and other things you plan on dipping.

Yield: 12 servings.

Twist on a s'more.  Chocolate wafer, marshmallow peanut butter chocolate, and banana.

Saturday, January 16, 2010

Blueberry-Sour Cream Muffins

The weather is finally warming up, the holidays are over, and school is back underway. Things are settling in fabulously and I am finding time and energy to cook again.

Now these don't exactly fall into the healthy categories but they do have blueberries so maybe you can convince yourself that they are considered a fruit serving.  And it's fun for the family.


While you might be able to find some boxed muffins that are lower in calories there is no way they taste this good.  Besides you know how I feel about pre-packaged, dehydrated food.

This recipe also comes from the woman that gave us the failed meatball recipe so she has redeemed herself in my eyes. I think it could use more lemon however... but then again she just said blueberry muffin not lemon-blueberry.... maybe I will figure out a way to turn them into lemon-blueberry muffins next time I make them.


Blueberry-Sour Cream Muffins
adapted from Eugina Bone (appearing in Food and Wine December 2009)

Ingredients
Topping (you can halve this to make it lower in calories)
½ cup light brown sugar
1/3 cup all-purpose flour
2 tablespoons unsalted butter, softened
1 teaspoon cinnamon

Muffins
1 ½ cup plus 1 tablespoon all-purpose flour
2 teaspoons baking powder
¼ teaspoon baking soda
½ teaspoon salt
1 large egg
¾ cup sugar
1 tablespoon unsalted butter, melted
1 rounded cup sour cream (I used light, but you could probably use fat free)
1 teaspoon pure vanilla extract
¾ teaspoon finely grated lemon zest
1 rounded cup frozen blueberries

Method
Topping
Preheat the oven to 375o. In a medium bowl, combine the brown sugar, flour, butter and cinnamon. Rub with your fingers to form coarse crumbs. Refrigerate until ready to use.

Muffins
Butter 12-cup muffin pan. In a medium bowl, whisk 1 ½ cups of flour with the baking powder, baking soda and salt. In a large bowl, using a hand-held mixer beat the egg at medium speed until frothy. Add the sugar and melted butter and beat until pale yellow, 1 minute. Beat in the sour cream, vanilla and lemon zest until blend. Add the dry ingredients and beat at low speed until almost blended. In a bowl, toss the blueberries with the remaining 1 tablespoon of flour. Using a rubber spatula, fold the blueberries into the batter.

Fill the muffin cups three-fourths full of batter and sprinkle with the topping. Bake for 25 minutes, or until a cake tester inserted in the center of a muffin comes out clean. Remove the muffins from the pan and let cool on a rack. Muffins can be stored in an airtight container for up to 3 days.

Thursday, November 26, 2009

Pumpkin Creme Brulee


I love the holiday season, Halloween, Thanksgiving, and Christmas. All those sweets and traditional foods, yet there are times when a tradition calls for an update. About four years ago my husband swapped out old traditional Stove Top Stuffing that I grew up with for a Ciabatta, Chestnut, Prosciutto, stuffing, and needless to say we have never gone back. I mean seriously, high quality, super flavor ingredients for a box of shriveled up pieces of what is supposedly bread? There is no comparison.

This year’s swap came in the dessert department. Every year we have to have Apple Pie for my daughter. For some reason it's not Thanksgiving without Apple Pie for her, I don't really think Apple Pie screams Thanksgiving for many people (not to me at least aside from her association) but what does say Thanksgiving dessert to many, many people is Pumpkin Pie.

When I was younger I was always a Pumpkin Pie for Thanksgiving dessert girl.  Now that I am older and can (and do) make Pumpkin Pie in the fall it feels kind of like a repeat at Thanksgiving. I know I could just not make it in October but really, I have no will power.

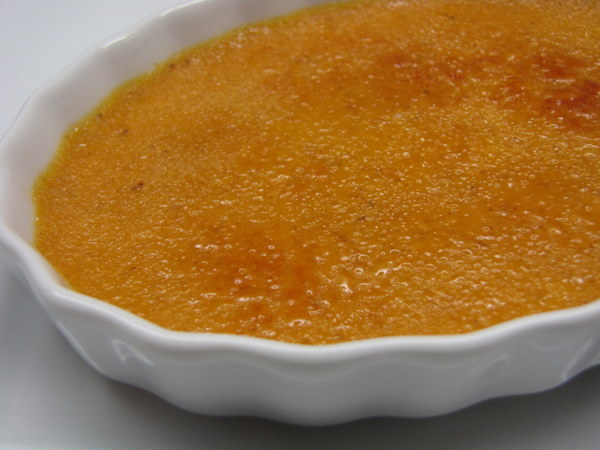
Enter the new Thanksgiving dessert.... ta da da daaaaaaaaaaaaaaaaaaa.... Pumpkin Crème Brulee. Yum! I really didn't make any changes to the recipe, and I have no idea what size my crème brulee cups are, but this did not come close to making 8 of any size, so I've adjusted the serving to six, but honestly I think it might be more like 4. I tried to make 8 and they came out very thin, too thin. Next time I will fill them twice as full and just make the four.  Note to readers... my 18 month old literally licked his plate on this one.


Pumpkin Crème Brulee
Adapted from Emeril

Ingredients

2 cups heavy cream
1/4 cup light brown sugar
1/4 cup sugar, plus 4 teaspoons
8 large egg yolks
1/2 teaspoon pure vanilla extract
1/4 teaspoon ground cinnamon
1/8 teaspoon grated nutmeg
1 cup mashed cooked pumpkin

Instructions

Preheat the oven to 325 degrees F.

Arrange 4 (6, or even 8 if you know how big your cups are) (1/2-cup) ramekins or custard cups in a large metal baking pan.

In a medium saucepan, combine the cream, brown sugar, and 1/4 cup granulated sugar. Bring to a bare simmer over medium-high heat, stirring to dissolve the sugar. Remove from the heat.

In a medium bowl, whisk the egg yolks until frothy and lemon-colored. Slowly add 3/4 cup of the hot cream mixture, whisking constantly. Add the egg mixture to the remaining hot cream, and whisk. Add the vanilla, cinnamon, nutmeg, and pumpkin, and whisk until smooth. Strain through a fine mesh strainer into a large bowl. Divide among the prepared custard cups.

Add enough hot water to come halfway up the sides of the cups. Bake until the custards are just set in the center but not stiff, 45 minutes to 55 minutes. Remove from the oven and refrigerate until well chilled, at least 3 hours or overnight.

Sprinkle each custard with 1/2 teaspoon of the remaining sugar. Using a kitchen torch, caramelize the sugar. (Alternately, preheat the broiler, and broil until the sugar melts and caramelizes, watching closely to avoid burning and rotating the cups, about 1 to 2 minutes.) Place on small dessert plates and serve.

Yield: 6 servings

Monday, November 9, 2009

Who likes Indian? Raise your left nostril!


I have been missing my friend Dharini a lot lately.  She moved to Canada a few months back to be with her charming husband, but there is an emptiness here where she used to be.  There is also an emptiness in my tummy!  I miss her food (she is from India and an excellent cook and was always gracious and kind and shared... yum).  However, she did attempt to teach me a few dishes and with that confidence I found this recipe and had to try it. 

Rava Dosas are from Southern India and can be filled with a variety of things or so I understand.  They can easily be gluten-free by substituting half and half rice and lentil flour instead of the third mixture for the rice, wheat, and semolina flours which I read is actually what they are normally made with, but this recipe said they are traditionally made with semolina, I'm more apt to believe the former but it doesn't matter because they were tasty.  (Don't quote me on this, I haven't given it a shot, but if you're gluten-free you probably already know tricks around this.  I will experiment next time and get back to you).

When I made them I omitted the jalapeño  because I wanted the little guy to be able to eat them, and while he likes spicy food I was afraid that would be too spicy.  It turns out that the recipe needed that jalapeño.  It wasn't nearly spicy enough for our crew, we will definitely be kicking this up another notch, but it's probably perfect for a  normal person that doesn't like their food to hurt them.  Oh well next time... which probably won't be too far in the future.

Think of these as a giant Indian soft serve taco.


Rava Dosas with Potato Chickpea Masala
adapted from Gourmet November 2009


Rava dosas—savory, crisp-edged crêpes popular in South India—are typically made from semolina and rice flours. Stuff them with hearty vegetables cooked in a blend of spices, chile, garlic, and ginger.

Makes 4 servings

Ingredients

For masala filling:

1 1/2 pounds Yukon Gold potatoes
1/3 cup dried grated unsweetened coconut
2 teaspoons cumin seeds
1 (3-inch) fresh jalapeño, coarsely chopped, including seeds
1 (2 1/2-inch) piece peeled ginger, coarsely chopped
3 garlic cloves, smashed
1 tablespoon curry powder
1/2 teaspoon cinnamon
1/2 teaspoon turmeric
1/3 cup vegetable oil
1 3/4 cups water, divided
1 large onion, chopped (about 3 cups)
1 (15-to 19-ounces) can chickpeas, rinsed and drained
1/2 cup frozen peas (do not thaw)
1/2 cup chopped cilantro

For rava dosas:

1/2 cup semolina flour
1/2 cup rice flour
1/2 cup all-purpose flour
1/2 teaspoon cumin seeds
1/2 teaspoon salt
2 cups water
Vegetable oil for brushing

Method

Make Masala filling:

Peel potatoes and cut into 1 1/2-inch pieces. Transfer to a bowl and cover with cold water.

Toast coconut in a 12-inch heavy skillet over medium heat, stirring occasionally, until golden, about 3 minutes. Transfer to a small bowl and wipe out skillet. Toast cumin seeds in skillet over medium heat, shaking skillet frequently, until fragrant and just a shade darker, about 30 seconds. Transfer to another small bowl. Reserve skillet.

Purée jalapeño, ginger, and garlic in a blender with curry powder, cinnamon, turmeric, oil, 1/4 cup water, and 1 teaspoon salt until smooth. Transfer purée to skillet and cook over medium-high heat, stirring, until thickened slightly, about 1 minute. Add onion and cook, stirring occasionally, until it begins to soften, about 8 minutes.

Drain potatoes, then add to onion mixture with cumin seeds and cook over medium heat, stirring occasionally, until potatoes are barely tender, about 10 minutes.

Add chickpeas and remaining 1 1/2 cups water, scraping up any brown bits, then briskly simmer, covered, until potatoes are tender, 16 to 20 minutes more. Add peas and cook, covered, until just tender, about 3 minutes. Remove from heat and stir in toasted coconut and cilantro.

Make dosas while potatoes cook:

Whisk flours, cumin seeds, salt, and water in a bowl.

**Generously brush a 12-inch nonstick skillet with oil and heat over medium-high heat until it shimmers. Pour 1/2 cup batter into skillet, swirling until bottom is coated. Cook, undisturbed, until dosa is set and edges are golden, about 2 minutes. Flip using a rubber spatula and cook dosa until underside is golden in spots, about 1 minute more. Transfer to a plate. Make more dosas with remaining batter, stacking and covering loosely with foil to keep warm. To serve, spoon masala filling into dosas.

Cooks' note:

Masala filling, without coconut and cilantro, can be made 6 hours ahead and chilled. Reheat before stirring in coconut and cilantro.

** The biggest complaint people had with this recipe was that making the crepe was difficult.  The batter is super thin and can cause some problems.  Too much oil and it will not cook properly, too little and it will stick.  For my small pan I found that 1/2 teaspoon of oil then brushed around the pan was perfect.  Also pour your batter in and DO NOT TOUCH for longer than you think.  I had the bubbles on the first cooked side and then smooth on the top.  I think I had to let my first side cook for about 4 minutes not 2, but I had my heat a little lower because I burned one.  When it is ready it should basically come right up when you put the spatula under the edge.  DO NOT FLIP until the edges are crispy, or it will be a mess.   Good luck.


Proof that Kids will eat them

Sunday, November 1, 2009

Vegetarian Potato Leek Soup (or not)


I have a secret.  I wish I had the willpower to be a vegetarian.  I LOVE most vegetarian food, and when I go out to restaurants I try to order vegetarian food because it always tastes so good, and I didn't have to cook it, or listen to complaints from the teenager for daring to serving something vegetable based. 

When I lived in Vermont there was a vegetarian restaurant called The Horn of the Moon Cafe in Montpelier.  The restaurant is gone now but the cookbook lives on.  This was one of my first cook books that I purchased while in college, and living as a vegetarian (it was short lived).  I used to make this soup once a week in huge batches and freeze it.  It tastes the same out of the freezer as it does fresh.  I will admit to you up front that when I went to make the soup I was still getting over the flu and when I opened the pantry I found beef stock and no vegetable stock so mine isn't vegetarian but I almost think it taste better with vegetable stock.  Either way, it's warm and filling and fantastic with fresh bread to clean the bottom of your bowl when you're done, it's so much more refined than licking it clean.


Potato Leek Soup
Horn of the Moon

Ingredients

6 cups of water or stock
6 cups diced potatoes
4 tablespoons butter
2 cups thinly sliced leeks (washed well and just the white part)
1 cup chopped celery
1 teaspoon dried leaf thyme
1 1/2 teaspoon dried dill weed
1 teaspoon salt
black pepper to taste
2 tablespoons unbleached white flour (leave out for gluten-free it will still be thick)
1 cup heavy cream
1/2 cup minced fresh parsley


Method

Bring water or stock to a boil in a soup pot.  Add potatoes.  Cover and cook until tender (20 to 25 minutes).  Turn off heat.

In a 10-inch fry pan, melt 2 tablespoons butter and sauté the leeks, celery, thyme, and dill weed until the leeks are well coated with butter.  Cover and cook on low heat until the leeks are tender (10 to 15 minutes).  Add to the potatoes and broth.  Blend in a blender, if you want lumpy soup only puree about 2/3rds of the vegetables.  Add salt and pepper to taste.

In the same pan in which the leeks were sautéed, melt the remaining 2 tablespoons butter, then add the flour.  Brown for 1 minute on low heat.  Whisk in cream and turn off heat.  Add to the soup, then add parsley.  Simmer 10 to 15 minutes, uncovered. 

If you're leftover soup gets too thick add a little more water or stock to thin it out as you reheat it.

Sunday, October 25, 2009

Pumpkin Scones


In case any of you were wondering, Earl Grey Tea does NOT ward off the flu as claimed. I know this because in the midst of my Earl Grey love affair I was ruthlessly struck down with H1N1.  About three days in, my 17 month old also got it, hence, the missing post from last week.  However, I was able to get off the couch for a few hours yesterday and then was able to wake up with the baby (who is running around like a mad man and you would never know he's sick at all).  He slept in and then wanted breakfast so I figured no better time than the present to jump back into Mommy duties.  These are a play on the Starbuck's seasonal scones and the first scones to ever grace my "test kitchen".  They received raved reviews from the husband who was more than happy to sleep in and wake up to fresh baked scones, and the little guy.  I personally couldn't tell you as my sense of taste is still missing, but maybe later when I peel myself off the couch again to make potato leek soup I will clear that problem up.


Pumpkin Scones


Ingredients

Scones
2 cups all-purpose flour
7 tablespoons sugar
1 tablespoon baking powder
1/2 teaspoon salt
1/2 teaspoon ground cinnamon
1/2 teaspoon ground nutmeg
1/4 teaspoon ground cloves
1/4 teaspoon ground ginger
6 tablespoons cold butter
1/2 cup canned pumpkin
3 tablespoons half-and-half
1 large egg

Powdered Sugar Glaze
1 cup powdered sugar
1 tablespoon powdered sugar
2 tablespoons whole milk

Spiced Glaze
1 cup powdered sugar
3 tablespoons powdered sugar
2 tablespoons whole milk
1/4 teaspoon ground cinnamon
1/8 teaspoon ground nutmeg
1 pinch ginger
1 pinch ground cloves

Method

Scones
Preheat oven to 425 degrees F. Lightly oil a baking sheet or line with parchment paper.

Combine flour, sugar, baking powder, salt, and spices in a large bowl. Using a pastry knife, fork, or food processor, cut butter into the dry ingredients until mixture is crumbly and no chunks of butter are obvious. Set aside.

In a separate bowl, whisk together pumpkin, half and half, and egg. Fold wet ingredients into dry ingredients. Form the dough into a ball.

Pat out dough onto a lightly floured surface and form it into a 1-inch thick rectangle (about 9 inches long and 3 inches wide). Use a large knife or a pizza cutter to slice the dough twice through the width, making three equal portions. Cut those three slices diagonally so that you have 6 triangular slices of dough. Place on prepared baking sheet.

Bake for 14–16 minutes. Scones should begin to turn light brown. Place on wire rack to cool.

Plain Glaze
Mix the powdered sugar and 2 tbsp milk together until smooth.

When scones are cool, use a brush to paint plain glaze over the top of each scone.

Spiced Icing
Combine the ingredient for the spiced icing together. Drizzle this thicker icing over each scone and allow the icing to dry before serving (at least 1 hour). A squirt bottle works great for this, or you can drizzle with a whisk.

Sunday, October 11, 2009

Earl Grey Cookies


It has been around 35 degrees here for almost a week.  THRITY-FIVE!  Hello?  It's early October.  Ridiculous!!  I am aVermont girl, and while I expect this kind of weather there, I do not expect it here in the Midwest, but low and behold it is 35 with snow, did I mention there was snow?  No?  There is snow, I am unimpressed.  I also would like you to know that it was in the 70s right before this lovely turn of events so we are not ready for the change, and when I say we I mean myself and my chattering teeth. 

So after coming in and being chilled there is nothing like a hot cup of tea.  However, I can only handle so much caffeine in a day so I opted for Earl Grey decaf tea.  As I sat with my hands wrapped around my steamy cup, I inhaled it's rich aroma and let it's spicy taste hit the back of my throat before setting down the cup in contentment.  As I sat relaxing I realized that there is a flavor I have never had anywhere other than Earl Grey tea and I couldn't place it.  Not surprising if I've never had it anywhere else, but I found it odd that I had never at least made a Google attempt.  It is unlike me to ask a question and not go look for the answer.


I decided I must know what this flavor was but first I needed cookies to go with my tea, and since Early Grey has such a fantastic flavor I thought why not make Early Grey cookies?  But how?  How to go about making a cookie with tea in them.  Do you just throw some tea leaves into a cookie recipe?  I am not really a baker, however after starting this site I have baked more in a few months than I have in the past five years.  I realize it's easier to cook and photograph when the baby goes to sleep.  However, I am not normally in the mood for an entire meal at 10pm, but I can eat baked goods the next day.

So how would someone with a limited baking repetoire go about inventing a cookie?  Ummm, steal it of course.  Who better to steal from than Martha?  She has yet to let me down for baking goodness.  She did have a lot of explaining to do after a Putunesca recipe that flopped after a whole lot of time, but that is for another day.


These are the easiest cookies in the world.  Another easy find and fall back for busy Mom's on the go.  SCORE!!  You can make these guys and leave them in their log in your freezer for months, then you can slice off a few cookies at a time and make them for drop in guest or dessert for the family when the mood strikes.  That is convient.  Even I have time to bake cookies somwhere inside of a span that covers months of time.  If you don't have time to bake a cookie that takes under 15 minutes in a three month span, then stop reading right now, get off your computer, and go enjoy your 5 minutes of freedom, I can't help you.

As for the flavor, I was a little surprised to find that the flavor is Bergamont, which is a citrus fruit.  It has been used throughout history to treat fevers, as a disinfectant and as an antidepressant (no wonder I feel warm and fuzzy after drinking a cup, well the warm part is probably from boiling water), a nerve calming agent, and helps fight the flu, fevers, and colds.  So apparently this Bergamont is some kind of super fruit, and I will be drinking a cup of Earl Grey every day all winter, or just eating the tea in these cookies.  Tomorrow  morning?  Probably both.


Earl Grey Tea Cookies

Adapted from
Martha Stewart, Weddings, Spring 2009

Ingredients

2 cups all-purpose flour, plus more for dusting
2 tablespoons finely ground Earl Grey tea leaves, (it was 4 bags for me)
1/2 teaspoon salt
2 (8 ounce) sticks unsalted butter, softened
1/2 cup confectioner's sugar
1 tablespoon finely grated orange zest

Method

Whisk together flour, tea, and salt in a small bowl; set aside.

Put butter, sugar, and zest in the bowl of an electric mixer. Mix on medium speed until pale and fluffy, about 3 minutes. Reduce speed to low; slowly mix in flour mixture until just combined.

Divide dough in half. Transfer each half to a piece of parchment paper; shape into logs. Roll the logs into parchment twist the ends ala tootsie roll. Refrigerate for at least 30 minutes.

Preheat oven to 350 degrees. Cut logs into 1/4-inch-thick slices. Space 1 inch apart on parchment-lined baking sheets.


Bake until edges turn golden, 13 to 15 minutes. Let cool on sheets on wire racks.

Wednesday, September 30, 2009

Chocolate-Pumpkin Swirl Brownies

I have been very busy this week with the end of my first class, however, I have my study group coming over tonight which was a perfect excuse to make this recipe.  I would highly recommend using canned pumpkin for this one.  For some reason when I pureed the fresh pumpkin little chunks did not break up, and while that may be able to hide in say a pie, not so much in a brownie.  I am hoping no chunks made it into the brownies I dropped off at the babies daycare this morning.  Happy eating.

Chocolate-Pumpkin Swirl Brownies


Martha Stewart Halloween 2004
Makes 16

Ingredients

8 tablespoons (1 stick) unsalted butter, plus more for pan
6 ounces bittersweet chocolate, chopped
2 cups all-purpose flour
1 teaspoon baking powder
1/4 teaspoon cayenne pepper
1/2 teaspoon salt
1 3/4 cups sugar
4 large eggs
1 tablespoon pure vanilla extract
1 1/4 cups solid-pack pumpkin
1/4 cup vegetable oil
1 teaspoon ground cinnamon
1/4 teaspoon ground nutmeg
1/2 cup chopped hazelnuts or other nuts


Method

Preheat oven to 350 degrees. Butter a 9-inch square baking pan or dish (I am thinking this is suppose to be 9X13, because I used a 9-inch and if you can tell from the photos I have brownie bread it is so thick). Line bottom of pan with parchment paper; butter lining.

Melt chocolate and butter in a heatproof bowl set over a pan of simmering water, stirring occasionally until smooth.

Whisk together flour, baking powder, cayenne, and salt in a large bowl; set aside. Put sugar, eggs, and vanilla in the bowl of an electric mixer fitted with the paddle attachment; beat until fluffy and well combined, 3 to 5 minutes. Beat in flour mixture.

Divide batter between two medium bowls (about 2 cups per bowl). Stir chocolate mixture into one bowl. In other bowl, stir in pumpkin, oil, cinnamon, and nutmeg. Transfer half of chocolate batter to prepared pan smoothing top with a rubber spatula. Top with half of pumpkin batter. Repeat to make one more chocolate layer and one more pumpkin layer. Work quickly so batters don't set.

With a small spatula or a table knife, gently swirl the two batters to create a marbled effect. Sprinkle with nuts.


Bake until set, 40 to 45 minutes. Let cool in pan on a wire rack. Cut into 16 squares.