Wednesday, September 30, 2009

Chocolate-Pumpkin Swirl Brownies

I have been very busy this week with the end of my first class, however, I have my study group coming over tonight which was a perfect excuse to make this recipe.  I would highly recommend using canned pumpkin for this one.  For some reason when I pureed the fresh pumpkin little chunks did not break up, and while that may be able to hide in say a pie, not so much in a brownie.  I am hoping no chunks made it into the brownies I dropped off at the babies daycare this morning.  Happy eating.

Chocolate-Pumpkin Swirl Brownies


Martha Stewart Halloween 2004
Makes 16

Ingredients

8 tablespoons (1 stick) unsalted butter, plus more for pan
6 ounces bittersweet chocolate, chopped
2 cups all-purpose flour
1 teaspoon baking powder
1/4 teaspoon cayenne pepper
1/2 teaspoon salt
1 3/4 cups sugar
4 large eggs
1 tablespoon pure vanilla extract
1 1/4 cups solid-pack pumpkin
1/4 cup vegetable oil
1 teaspoon ground cinnamon
1/4 teaspoon ground nutmeg
1/2 cup chopped hazelnuts or other nuts


Method

Preheat oven to 350 degrees. Butter a 9-inch square baking pan or dish (I am thinking this is suppose to be 9X13, because I used a 9-inch and if you can tell from the photos I have brownie bread it is so thick). Line bottom of pan with parchment paper; butter lining.

Melt chocolate and butter in a heatproof bowl set over a pan of simmering water, stirring occasionally until smooth.

Whisk together flour, baking powder, cayenne, and salt in a large bowl; set aside. Put sugar, eggs, and vanilla in the bowl of an electric mixer fitted with the paddle attachment; beat until fluffy and well combined, 3 to 5 minutes. Beat in flour mixture.

Divide batter between two medium bowls (about 2 cups per bowl). Stir chocolate mixture into one bowl. In other bowl, stir in pumpkin, oil, cinnamon, and nutmeg. Transfer half of chocolate batter to prepared pan smoothing top with a rubber spatula. Top with half of pumpkin batter. Repeat to make one more chocolate layer and one more pumpkin layer. Work quickly so batters don't set.

With a small spatula or a table knife, gently swirl the two batters to create a marbled effect. Sprinkle with nuts.


Bake until set, 40 to 45 minutes. Let cool in pan on a wire rack. Cut into 16 squares.

Monday, September 28, 2009

Twice Baked Goat Cheese Souffle


Come closer my little friends. Let me tell you about a recipe that is little work with big results. A recipe that is so delicate and flavorful, I am considering asking it to be my secret boyfriend. I doubt the husband will mind, he too fell in love with this dish. This falls under one of those dishes that I always shied away from because it just sounded daunting. The soufflé. Ooohhh.

I think it might have something to do with going to restaurants where the waiter tells you, “… and if you want the chocolate soufflé for dessert you should have ordered it when you made your reservation.” Okay that might be a big of an exaggeration, but you do need to order it at the beginning of your meal. What kind of work must a dessert take that you need to order it before you pick your first course? What if you’re not hungry after you meal? Obviously this delicate dessert will not travel, it would be like asking for a crème brulee to go, it’s probably not going to work.

Well maybe not for those restaurant fussy soufflés, but this is a tough soufflé, like a chocolate soufflés scrappy little sister. It doesn’t achieve the insane heights that other soufflés have but you can make it ahead of time, and even in our house where things are crazy and very VERY loud it didn’t fall in the oven, and like so many dishes and articles of clothing in our house, if it survives…. It’s in!

This is the type of dishes I always want to post, something that looks fancy and impressive, sounds fancy and impressive, but can be made the night before you plan on serving it, after the kids are in bed, and the dishwasher is humming away on the dinner dishes.

The next night you throw it in the oven for 5 minutes while you make a quick cream (which I found totally unnecessary), and ta da…. you get a wonderful first dish for your dinner guest… or if you are me you eat two of them as a main course and call it a night. Serve this over greens with your favorite vinaigrette.  I used a warm bacon vinaigrette.

Now if you went to someone’s house for dinner and they served you a soufflé wouldn’t you be impressed? Now if you serve it to your friends, they will be impressed with you. Seriously, the husband helped me make them and it was so good I still got all the praise.


Twice-Baked Goat Cheese Souffles with Salad


Gourmet December 1998
Serves 6 as a light main course

Ingredients

1/2 pound aged (firm) goat cheese
4 large eggs
3 1/2 tablespoons unsalted butter
1/3 cup all-purpose flour
1 1/3 cups whole milk
2 teaspoons Dijon mustard
2 teaspoons finely chopped fresh thyme leaves
3/4 cup heavy cream

Accompaniment: salad greens tossed with vinaigrette

Method

Preheat oven to 375°F and butter six 3/4-cup ramekins (3 3/4 by 2 inches). Crumble goat cheese and separate eggs. In a saucepan melt butter over moderately low heat and whisk in flour. Cook roux, whisking, 3 minutes and whisk in milk. Bring mixture to a boil, whisking constantly, and simmer, whisking occasionally, 3 minutes. Remove pan from heat and add yolks, mustard, 1 teaspoon thyme, two thirds cheese, and salt and pepper to taste, whisking until cheese is melted. Transfer yolk mixture to a large bowl.

In another large bowl with an electric mixer beat whites with a pinch salt until they just hold stiff peaks. Stir one fourth whites into yolk mixture to lighten and fold in remaining whites and remaining cheese gently but thoroughly.


Divide soufflé mixture among ramekins and arrange in a large baking pan just large enough to hold them. Add enough hot water to baking pan to reach halfway up sides of ramekins. Bake soufflés in middle of oven until slightly puffed and golden brown, about 20 minutes, and transfer to a rack. Let soufflés stand, uncovered, 30 minutes (soufflés will fall slightly).


Lightly butter a baking sheet. Run a thin knife around edges of soufflés. Invert each soufflé onto palm of your hand and carefully put, right side up, onto baking sheet. Soufflés may be made up to this point 2 days ahead and chilled, covered.

Increase temperature to 425°F.

In a small saucepan bring cream with remaining teaspoon thyme and salt and pepper to taste to a boil. Remove pan from heat and keep cream warm, covered. Bake soufflés in middle of oven until slightly puffed and heated through, about 5 minutes.

Transfer soufflés to plates. Spoon 2 tablespoons cream over each soufflé and arrange salad decoratively alongside.

Wednesday, September 23, 2009

Pumpkin Whoopie Pies


Welcome to the test kitchen! Well the temporary test kitchen, while I try out new pumpkin recipes this year. I enlisted some help for ideas on what type of pumpkin recipes to make. The first response was Pumpkin Whoopie Pies, which I immediately put on the list as the first thing to make.

This recipe was really easy. Getting the ingredients for this recipe? Not so much. Are you aware that there is a canned pumpkin shortage this year? Neither was I, but I am now. I went to the store to pick up my pumpkin and was met with a little sign that stated that due to a whole lot of rain at the Libby pumpkin patch there is no pumpkin. What? How can that be? How can there be no pumpkin this close to Halloween and Thanksgiving? And apparently Libby is the only supplier of pumpkin because there wasn't even an empty space on the shelf where the other brand of pumpkin should have been. I was lucky enough to spot a space on the very bottom shelf way in the back that had a few cans above the listing: Organic Pumpkin Puree, $1000. I snatched up the last two cans. I am a fan of organic stuff and I figured the time it would save me would make it all worth it. And it might have... please continue.

I got home and went about my directions until I got to the part where I was to add the pumpkin. I opened the can and immediately knew that something was wrong. Where there should have been a lovely orange puree, with nice texture, there was a dark, sickly, runny, mess with large specks of spice. Not good! I picked up the can as I remembered that I had not actual read the label while at the store, and found exactly what I thought I would find.  Organic Pumpkin Mix!  $&#%! Pause. Breathe....................... breathe again........ *%^#^!

I continued my little number and symbol venting while I put my shoes on and went back to the store (make that three stores) with the baby in tow to find that no one has any pumpkin. Apparently Libby has a monopoly on pumpkin, which should be illegal! Just saying.

So I went to the produce section and there they were. The little pie pumpkins. I cracked and decided it really would be easier to just make my own, plus I was halfway into the recipe already and I really wanted a pumpkin whoppie pie. I picked up the small pumpkin and began to load them into my cart but was interrupted by chubby little hands that really wanted the orange "ball". I handed one over and it was immediately held out over the floor, dropped, and saved (by me), and replaced in the cart, to the protests of "baaaaallll, ball, ball, ball." I spied a small yellow and green gourd that looked a lot like a pumpkin and handed it over to delighted squeals. He carried his "pumpkin" with him all night giving it kisses, and trying to eat it like an apple, funny little person. He was very upset when we wouldn't let him sleep with it.

If you do not have time to roast your own pumpkin you can wait until October 1, when Libby has promised to grace the shelves of supermarkets everywhere once again with their canned pumpkin. However, it's not hard to roast it yourself. It took a little longer but now when I have grandkids and I propped them up on the chair next to me to make Pumpkin Whoopie Pies at Halloween I can break out the Great 2009 Pumpkin Shortage story. I'm thinking of throwing in an uphill walk in a snowstorm to fight my way through crowds to get the pumpkin just for a little spice.


How to Roast a Pumpkin:

Preheat oven to 350 degrees. Line a rimmed cookie sheet with foil or parchment paper. Cut off the tope part of the pumpkin, cut pumpkin in half. Remove seeds and nasty stringty stuff. Place pumkin cut edges down so you have a little pumkin cave or sorts. Cook for about an hour or until the flesh of the pumpkin is soft. (someone do a pumpkin word count on this post and get back to me). Remove the pumkin from the oven and flip over so that the cut side is now facing up so it can cool.

When cooled enough to handle scoop out the flesh. I put mine just like that in the refridgerator overnight since I was running out of time thanks to the trip to the store. Then I pureed it the next night and baked with it. If the puree is too dry add a tiny bit of water until it is smooth. If it is too wet, bring to a boil on the stove in a pot. Still too wet, strain through cheesecloth. If you bake the pumpkin instead of boiling it, it probably won't be too wet. Voila! See? Easy.


Pumpkin Whoopie Pies with Cream Cheese Filling
Adapted from Matt Lewis of Baked Bakery

Ingredients

Cookies
3 cups all-purpose flour
1 teaspoon salt
1 teaspoon baking powder
1 teaspoon baking soda
2 tablespoons ground cinnamon
1 tablespoon ground ginger
1 tablespoon ground cloves
2 cups firmly packed dark-brown sugar
1 cup vegetable oil
3 cups pumpkin puree, chilled
2 large eggs
1 taspoon pure vanilla extract
Filling
3 cups confectioners' sugar
1/2 cup (1 stick) unsalted butter, softened
8 ounces cream cheese, softened
1 teaspoon pure vanilla extract

Method

Cookies
Preheat oven to 350 degrees. Line two baking sheets with parchment paper or a nonstick baking mat; set aside.

In a large bowl, whisk together flour, salt, baking powder, baking soda, cinnamon, ginger, and cloves; set aside. In a LARGER bowl, whisk togehter brown sugar and oil until well combined. Add pumpkin puree and whisk until combined. Add eggs and vanilla and whisk until well combined. Sprinkle flour mixture over pumpkin mixture and whisk until fully incorporated.

You can use a small ice cream scoop here with a releasing mechanism, (but I just used heaping tablespoons to make smaller pies). Drop heaping tablespoons of dough onto prepared baking sheets, about 1 inch apart. Transfer to oven and bake until cookies are just starting to crack on top and a toothpick i nserted into the center of each cookie comes out clean, aobut 15 minutes. Let cool completely on pan.

Filling
Sift confectioners' sugar into a medium bowl; set aside. In the bowl of an electric mixer fitted with the paddle attachment, beat butter until smooth. Add cream cheese and beat until well combined. Add confectioners' sugar and vanilla, beat just until smooth. (Filling can be make up to a day in advance, bring to room temperature before using).


Assemble the whoopie pies: Line a baking sheet with parchment paper and set aside. Transfer filling to a disposable pastry bag (or a plastic sandwich bag like I did, works the same and you probably have one of those) cut the end off the bag (or the corner of the sandwich bag). When the cookies have cooled completely, pipe a large dollop of filling on the flat side of half of the cookies. Sandwich with remaining cookies, pressing down slightly so that the filling spreads to the edge of teh cookies. Transfer to prepared baking sheet and cover with plastic wrap. Refrigerate cookies at least 30 minutes before servings and up to 3 days.

Makes 18 small or 12 large pies

Sunday, September 20, 2009

Honeyed Fig Crostatas


It is Fig season, and I have never cooked with Figs before this year. I did find some very cute mini green figs a little while ago, which I quickly smothered in goat cheese, topped with honey and popped in the oven. Which was good, but this time I wanted to try something different.

So how convienent that I went to my mailbox and found a subscription to Food and Wine. A surprise little gift from my fantastic foodie brother-in-law that shares my love of new recipes and yummy ingredients. Thank you Robert, I promise to make you something tasty when you visit.

I have no quirky stories to go with this recipe since I have stumbled through this last week in a frantic dance of being late, and not having enough time to breath. Thankfully this recipe came together in about 5 minutes and there were no unexpected surprises (stay tuned for the Pumpkin shortage of 2009 for next weeks post).

The Crostata recipe was very yummy (cannot even be creative in my descriptions tonight sorry) and was a nice compliment to the light fruit. The one issue I had was with the thyme, I’m not sure what that was supposed to do but it tasted way to earthy for the rest of the flavors for me. I would leave it out; I’m actually thinking maybe black pepper next time instead… I will have to do a little research on whether or not those two flavors will mesh. Should be easy when my Flavor Bible shows up this week, just ordered it via suggestion from the Gluten-free Girl, and I’m also thinking I will retry this with apple and on a separate Crostata raspberries…. Totally predictable I know. Enjoy.

Honeyed Fig CrostatasAdapted from Food and Wine October 2009
Ingredients

2 1/2 cups all-purpose flour
1/4 cup plus 1 tablespoon sugar
Kosher salt
1 1/2 sticks cold unsalted butter, cut into 1/2-inch pieces
1/4 cup plus 3 tablespoons ice water
1 1/2 pounds fresh green and purple figs, each cut into 6 wedges
5 teaspoons honey
1 teaspoon fresh lemon juice
1/4 teaspoon thyme leaves, plus small sprigs for garnish
1 egg beaten with 1 tablespoon of water


Method

In a food processor, pulse the flour with the sugar and 1/2 teaspoon of salt. Add the butter and pulse until it is the size of peas. Add the water; pulse until the dough comes together. Pat the dough into a disk, wrap in plastic and refrigerate for 30 minutes.

On a lightly floured surface, roll out the dough 1/8 inch thick. Cut out eight 5-inch rounds, rerolling the scraps if necessary; transfer to a parchment paper–lined baking sheet and refrigerate for 30 minutes.

Preheat the oven to 375°. In a bowl, toss two-thirds of the figs with 3 teaspoons of the honey, the lemon juice, thyme leaves and a pinch of salt. Arrange the figs on the dough rounds, leaving a 1/2-inch border all around. Fold the edges over the figs and brush the dough with the egg wash. Chill for 30 minutes.


Bake the crostatas for 35 minutes, rotating halfway through baking, until the crusts are golden. Let stand for 10 minutes.

Gently toss the remaining figs with the remaining 2 teaspoons of honey. Transfer the crostatas to plates, top with the figs and thyme sprigs and serve.
 

Sunday, September 13, 2009

Empanadas Done Two Ways (or if you're under 10... hot pockets)


The problem with always making new recipes is that very few get remade often. It’s not that we don’t like those recipes because we do, we really do. It’s just that there are so many new ones I want to try when I have free time (which is very little these days) and the recipes that make it into frequent dinner rotation tend to be easy, quick, or low labor intensive and not ridiculously expensive, this is one of those recipes.

I have about 30 minutes to get dinner on the table before the baby has a hunger melt down or snacks on baby puffs to the point where he has no intention of eating what we just put in front of him so I like things that can be pre-prepped or half cooked the night before I intend on serving them, so that I can do the work after the baby goes to bed, so I can cook without a little monkey hanging on my leg chanting up, up, up, up, up.
I pre-made the dough for these and froze it until the night before I planned on cooking them. Took it out of the freezer and let it thaw in the fridge overnight. When we got hom from work I stuffed the little disks and cooked them right before dinner and had food on the table in 40 minutes.... and they reheat well in a microwave... ahhhhhh..... lunch for the next day.


Note if you are not familiar with dough. This is not cookie dough. If you roll it out and it’s not quite perfect make due, it will get more elastic after the first roll and not want to stay rolled out in order to be filled. When I removed the dough from the fridge I cut it into equal portions, balled it up in my hands then flattened briefly before rolling into a slightly oblong shape to be filled, it worked perfectly.


PS. if you tell your kid they are hot pockets instead of empanadas they will eat them right up.

Chicken Empanada with Chorizo and Olives
Adapted from Smitten Kitchen who adapted it from Gourmet, January 2005
Makes 24 small or 12 large empanadas
Ingredients

Dough: (I used this dough with both fillings because it was sooooo good and buttery)


4 1/2 cups unbleached all-purpose flour
3 teaspoons salt
2 sticks (1 cup) cold unsalted butter, cut into 1/2-inch cubes
2 large eggs
2/3 cup ice water
2 tablespoons distilled white vinegar


Filling:

3 whole chicken legs, including thighs (2 to 2 1/4 lb total)
1 teaspoon salt
1/4 teaspoon black pepper
4 1/2 tablespoons extra-virgin olive oil
2 large onions, halved lengthwise, then cut lengthwise into 1/4-inch-wide strips
2 large garlic cloves, minced
2 Turkish bay leaves or 1 California
1/3 cup finely diced Spanish chorizo (cured spiced pork sausage; 1 1/2 oz; casings discarded if desired)
1/2 teaspoon Spanish smoked paprika (not hot)
1/4 cup chopped pitted green olives
1/2 cup dry white wine
1/2 cup reduced-sodium chicken broth

Egg Wash:1 egg, lightly beaten with 1 tablespoon water

Make Dough: Sift flour with salt into a large bowl and blend in butter with your fingertips or a pastry blender until mixture resembles coarse meal with some (roughly pea-size) butter lumps.

Beat together egg, water, and vinegar in a small bowl with a fork. Add to flour mixture, stirring with fork until just incorporated. (Mixture will look shaggy.) Turn out mixture onto a lightly floured surface and gather together, then knead gently with heel of your hand once or twice, just enough to bring dough together. Separate into two flat disk and chill them, each wrapped in plastic wrap, at least 1 hour. Dough can be chilled up to 8 hours total.

Make Filling: Pat chicken dry and sprinkle with salt and pepper. Heat 2 tablespoons oil in a 12-inch heavy skillet over moderately high heat until hot but not smoking, then brown chicken, turning over once, about 6 minutes total, and transfer to a plate. Sauté onions, garlic, and bay leaves in fat remaining in skillet, stirring frequently, until onions are softened, 4 to 5 minutes.

Add chorizo and paprika and cook, stirring, 1 minute. Add olives, wine, and broth and bring to a boil, stirring and scraping up any brown bits. Return chicken to skillet along with any juices accumulated on plate, then reduce heat to moderately low and simmer chicken, covered, turning over once, until tender, 25 to 30 minutes total.

Transfer chicken to a clean plate. (Sauce in skillet should be the consistency of heavy cream; if it’s not, briskly simmer until slightly thickened, about 5 minutes.) When chicken is cool enough to handle, discard skin and bones and coarsely chop meat. Stir chicken into sauce and discard bay leaves. Season with salt and pepper, then cool filling, uncovered, about 30 minutes (or refridgerate overnight).

Form Empanadas: Put oven racks in upper and lower thirds of oven and preheat oven to 400°F. Divide first dough and half of second dough into 18 equal pieces and form each into a disk. (The remaining dough can be stored in the freezer for future use.) Keeping remaining pieces covered, roll out 1 piece on a lightly floured surface with a lightly floured rolling pin into a 5-inch round (about 1/8 inch thick).

Spoon about 2 tablespoons filling (for large 2 teaspoons for small) onto center and fold dough in half, enclosing filling. Press edges together to seal, then crimp decoratively with your fingers or tines of a fork. Transfer empanada to a baking sheet. Make 17 more empanadas in same manner, arranging on 2 parchment-lined baking sheets.

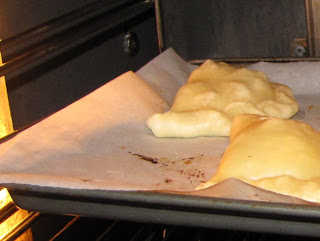
Lightly brush empanadas with some of egg wash and bake in upper and lower thirds of oven, switching position of sheets halfway through baking, until golden, about 25 minutes. Transfer empanadas to a rack to cool at least 5 minutes. Serve warm or at room temperature.

Beef Filling

Adapted again from Smitten Kitchen who adapted it from Gourmet September 2007.... must branch out more so that I am not always remaking her recipes... but they are so good!
Makes 24 small empanadas or 12 large

Ingredients

2 hard-boiled farm fresh eggs, or whatever kind you have, chopped into bits
1/2 medium onion, finely chopped
1 tablespoon olive oil
1 garlic clove, finely chopped
1 teaspoon ground cumin
3/4 teaspoon dried oregano
3/4 pound ground sirloin
2 tablespoons raisins
1 1/2 tablespoons chopped pimiento-stuffed olives (I finely chopped these but I think a bigger chop next time will produce more flavor)
1 (14-ounce) can petite diced tomatoes in juice, drained, reserving 2 tablespoons juice
1 egg beaten with 2 teaspoons water (for egg wash)

Method

Cook onion in olive oil in a heavy medium skillet over medium heat, stirring frequently, until softened. Add garlic, cumin, and oregano and cook, stirring, 1 minute. Stir in beef and cook, breaking up lumps with a fork, until no longer pink, about 4 minutes.
Add raisins, olives, 1/2 teaspoon salt, 1/4 teaspoon pepper, and tomatoes with reserved juice, then cook, stirring occasionally, until liquid is reduced but mixture is still moist, about 5 minutes. Stir in hardboiled egg and spread on a plate to cool.


Lower your racks to the bottom third of the oven. Preheat oven to 400 degrees to cook right away or place in container in fridge overnight if you are cooking them the next day like I did.
Flour work area. Pull out your dough, cut into equal pieces. I used 1.5 oz. pieces for my small empanadas. Roll into a ball in your hand like you used to when you were a kid with play dough. Or like you do now when playing with your kids ;) Flatten ball by smushing onto counter with the palm of your hand. Flour your rolling pin and gently roll out into an oblong shape. Eyeball the half way point in your oblong and fill with 2 teaspoons of filling for small disk and 2-3 tablespoons for large. Fold disk in half (SK recommends using water to help seal edges, didn’t see that until just now so I don’t think it’s necessary but can’t hurt). Moisten edges of disk with water and fold over to form a semicircle, then crimp with a fork, or fold over with fingers like you’re tucking in the edged on top of the half moon, stuffed, disk. Make more empanadas in same manner.

Lightly brush empanadas with some of egg wash and bake in lower third of oven, until golden, about 25 minutes. Transfer empanadas to a rack to cool at least 5 minutes.

Sunday, September 6, 2009

Mascarpone Gelato with Macerated Berries


I would like to welcome back my friend Alex from her honeymoon with her new husband, Kevin. They spent ten days in Italy, lucky ducks. Here's a little recipe to remind you of the Italia when you miss it. Welcome home and congratulations.

And now on to my slightly less exciting life. One of my new favorite things to do after dinner, when the baby has been fed and bathed, smelling great and being all cute in his jammies, is to strap him into the stroller and take the 30 minutes walk to the local co-op. I get an hour worth of walking in, the baby gets some fresh air, and we come home with yummy food. A win all around I would say. Just this past week on one such walk I found freshly picked, local, organic raspberries, and farm fresh eggs. Both of which I snatched up greedily. Only when I went to pick up the eggs, they were the smallest eggs I have ever seen. Or they seemed to be, I don’t remember Vermont farm eggs being so tiny. I mean seriously they were cute. See?
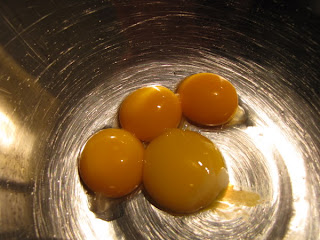
On the left is the farm egg and on the right is the leftover grocery store organic egg from the refrigerator (there is actually more of a size difference than is apparent in the photo). Doing a quick calculation in my mind, I decided I would need three eggs for any recipe that called for two. Meaning if I grabbed a dozen I would only have enough for four recipes. That doesn’t last long around our house despite my lack of baking skills (I still blame our stupid little oven, more on that to come at a later date.) so I decided I would get two dozen. Which seemed like a completely logical idea to me, until I got home and my husband asked what we were going to do with two dozen eggs.

Little did he know how amazing fresh eggs are. I won’t bore you with my rambling about fresh eggs, but if you’ve never had them they are a completely different experience than the bland, rubbery stuff you buy in the grocery store. They are flavorful and tender and crumbly. They aren’t even the same color as grocery store eggs… and now I’m going on. So back to the what to do with the egg dilemma. We had left over ciabatta rolls from the pulled pork so my husband made us bird in a nest with fresh cheddar and bacon and those were so good, but he laughed that it took two birds to fill the tiny nest, when normally it would only take one… might my calculations have been off? *Note to self, possibly two farm fresh eggs = one nasty grocery store egg.

Then there were the raspberries. Oh raspberries (insert image of grown woman doing the happy dance here)… how I love thee. I mean I really LOVE raspberries. They are my favorite food in the world. When I get those stupid questions like what would I eat if I could only eat one thing for the rest of my life…. I usually answer cheese, because that is my indulgent food, but honestly I would pick raspberries over cheese. That is a collective gasp of shock you hear from my friends and family who know me fondly as a cheese-a-holic. This recipe however could be the best thing in the world because it combines my two loves above with…… ready for it….. ice cream! Well Gelato to be exact but to be honest I can’t seem to get a straight answer from anyone or even the web as to what constitutes the difference between gelato and ice cream other than some sketchy information about air content. Some say gelato contains no egg, and other recipes that claim to be ice cream have no egg so does that make that really a gelato? Then some say cream versus milk but again I found both nomenclature with both cream and or milk. Since I am using an automated little ice cream maker I have no control so I suspect the “ice creams” and “gelatos” I make both have about the same amount of air in them, so we’re just going to play along and call this a gelato since that is what the original recipe called it.


This recipe is adapted from Emeril’s Marscapone Gelato with Macerated Strawberries. The only difference other than the obvious swap of berries was that I halved the amount of marscapone from his 16oz. to 8oz. Partly because I just wrote marscapone on my grocery list not noting how much I would need (they come in 8oz containers, and I only bought one) and partly because this weeks blog was suppose to be Avacado gelato, which I had heard was fantastic but really just ended up tasting like frozen guacamole, so I didn’t want the marscapone flavor to be too strong. I also added the vanilla where his recipe didn’t have any. And my finally adjustment was to add 5 egg yolks instead of 4 because of their miniature nature, I probably could have gotten away with 6 but I figured egg flavored gelato would probably be as tasty as frozen guacamole so I went light. Here is a regular yolk next to the original three to see how many of my little orange beauties would make up one large yolk.

Mascarpone Gelato with Balsamic-Macerated Strawberries

Adapted from Emeril on Food Network
Ingredients

1 container raspberries
2 tablespoons balsamic vinegar
4 tablespoons sugar
1/2 cup simple syrup (boil 2 parts water to 1 part sugar until dissolved)
4 egg yolks (or 5 mini farm fresh yolks)
8 ounces mascarpone
1/4 cup light corn syrup
1 cup milk
2 tablespoons lemon juice
1 teaspoon good quality vanilla extract (if you go to put it in and it says imitation vanilla... throw it in the garbage and go to the store and buy some real vanilla extract)

Method
In a small, non-reactive bowl toss raspberries with balsamic vinegar and sugar and set aside to macerate while you prepare the gelato.


In a metal bowl whisk together simple syrup and egg yolks, set the bowl over a pan of simmering water and whisk continuously until the mixture reaches the ribbon stage (thick, pale yellow and forms a ribbon when the whisk is lifted). Mine got REALLY foamy first so if it does that and still thickens don’t worry.

Remove the bowl from the heat, transfer to the bowl of an electric mixer and beat at low speed until cool. Whisk in the mascarpone, corn syrup, milk, vanilla, and lemon juice and strain mixture through a fine sieve.


Chill thoroughly, then process in an ice cream machine according to manufacturer's directions.

Serve with macerated berries.


This is a seriously rich dessert, but it is not horrendously sweet and the raspberries were fantastic. If you’ve never had balsamic and berries before be brave and try it, it’s not what you think. It was just yummmy.... and only made me want to go to Italy more, if only to ask.... What the hell makes it gelato?